BooktPro Documentation
About This Guide
How to Install
Congrats on grabbing your copy of Bookt, hands down the best appointment scheduling plugin for WordPress around. Installing Bookt is the exact same process as any other WordPress plugin. Here’s how it’s done:
1. Download your copy of Bookt from the API DOWNLOADS section of your account. You’ll then click the download link, as shown here:

***Important: Many operating systems will automatically unzip this file. However you will be uploading this exact .zip file so it needs to remain zipped. If your OS unzips files automatically, you will need to compress the file into a .zip in order to proceed.
***Important: You must not change the title of this file. The title formatting is critical in ensuring you can activate your plugin’s API key.
2. In your site’s WordPress admin area, navigate to the Plugins tab. There, you will see a button titled “Add New” at the top of the page.
Click this button, and then click “Upload Plugin” button found in the same location. Finally, select the plugin file from your computer by clicking the “Choose File” button, which will allow you to locate your .zip plugin file from your computer.
3. After selecting the correct file, you will then click “Upload”. After the upload is compelte, click the “Activate Plugin” button, and you’re done!
On completing the above steps, the plugin has now been correctly installed. However in order to receive updates and ongoing support, you’ll need activate the API key assigned to you based on the license you chose when making the purchase. Activating your API Key is covered in the next section of this documentation.
Activating Your API License Key
Each Bookt plugin must be activated via a unique API key in order to receive updates and notifications of new releases in the WP Dashboard. These keys are automatically assigned to your product, and found in the API Keys tab in the account area. Activating your product is an ultra-quick process that only takes a few moments to complete:
1. In your account area you will notice a section titled “API KEYS” in the left-hand sidebar. Go ahead an click that link to see your API keys, each categorized by their corresponding product. Locate the correct API Key, and copy it to your clipboard for later use.
2. Now with the copied API Key, return to WP-ADMIN. If you completed the installation of the Bookt plugin, you will notice that a new tab has been added to your sidebar titled “BooktPRO”. However the API Activation is found in the core “Settings” tab. Hover your cursor over that tab and you’ll see a sub-section titled “BooktPRO Activation”, which you’ll want to click.:
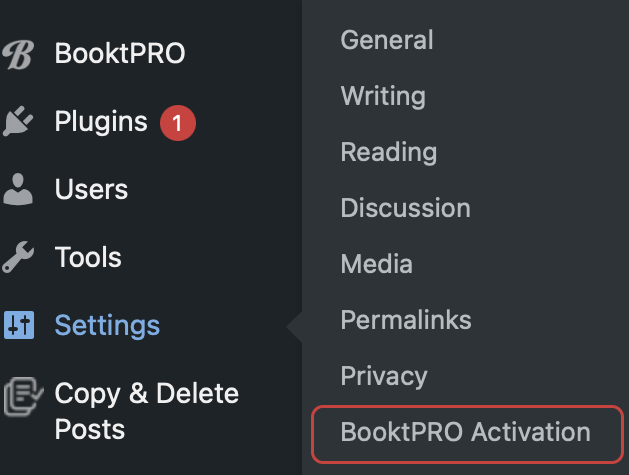
3. On this screen you’ll see the field where you’ll want to paste the API Key that you copied form your account area, and select “Activate”.
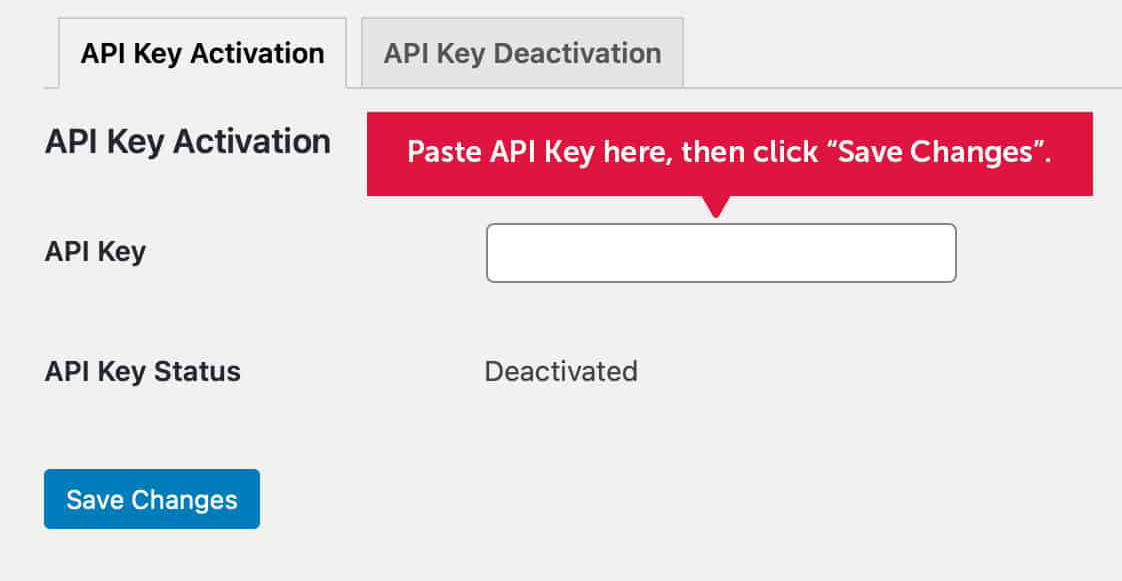
You’re done! If succesfully activated, you will see the status changed to “ACTIVATED: alongside the number of active and remaining uses of the key.
Important Notes on API Key Activation:
- There is a glitch that sometimes causes the plugin to be set to inactive by default. This setting is in the “Deactive API Key” tab. You may need to navigate to this tab ans ensure the “Deactivate API Key” checkbox is NOT selected. Then, click “update” and try activating the API Key again on the other tab.
- The most common cause for API activation to not work is site caching. Site caching can cause your site to not communicate with our API validation server. Be sure to disable caching temporarily until you succesfully activate your plugins. Note this can also be cause by third party “optimization” services such as Cloudflare.
Admin Overview
After installing and activating our software, you will see a new section added to your WordPress admin’s sidebar title “BooktPRO” and beneath that you will see the core Bookt sub-sections: BooktPRO Settings, and Appointments. The BooktPRO Settings tab is where you’ll want to click to begin setup, and an overview of what you’ll find there is shown below.
After clicking the “BooktPRO Settings” tab, here’s what you’ll see (note you can open this image in a new window for a closer view of each detail:
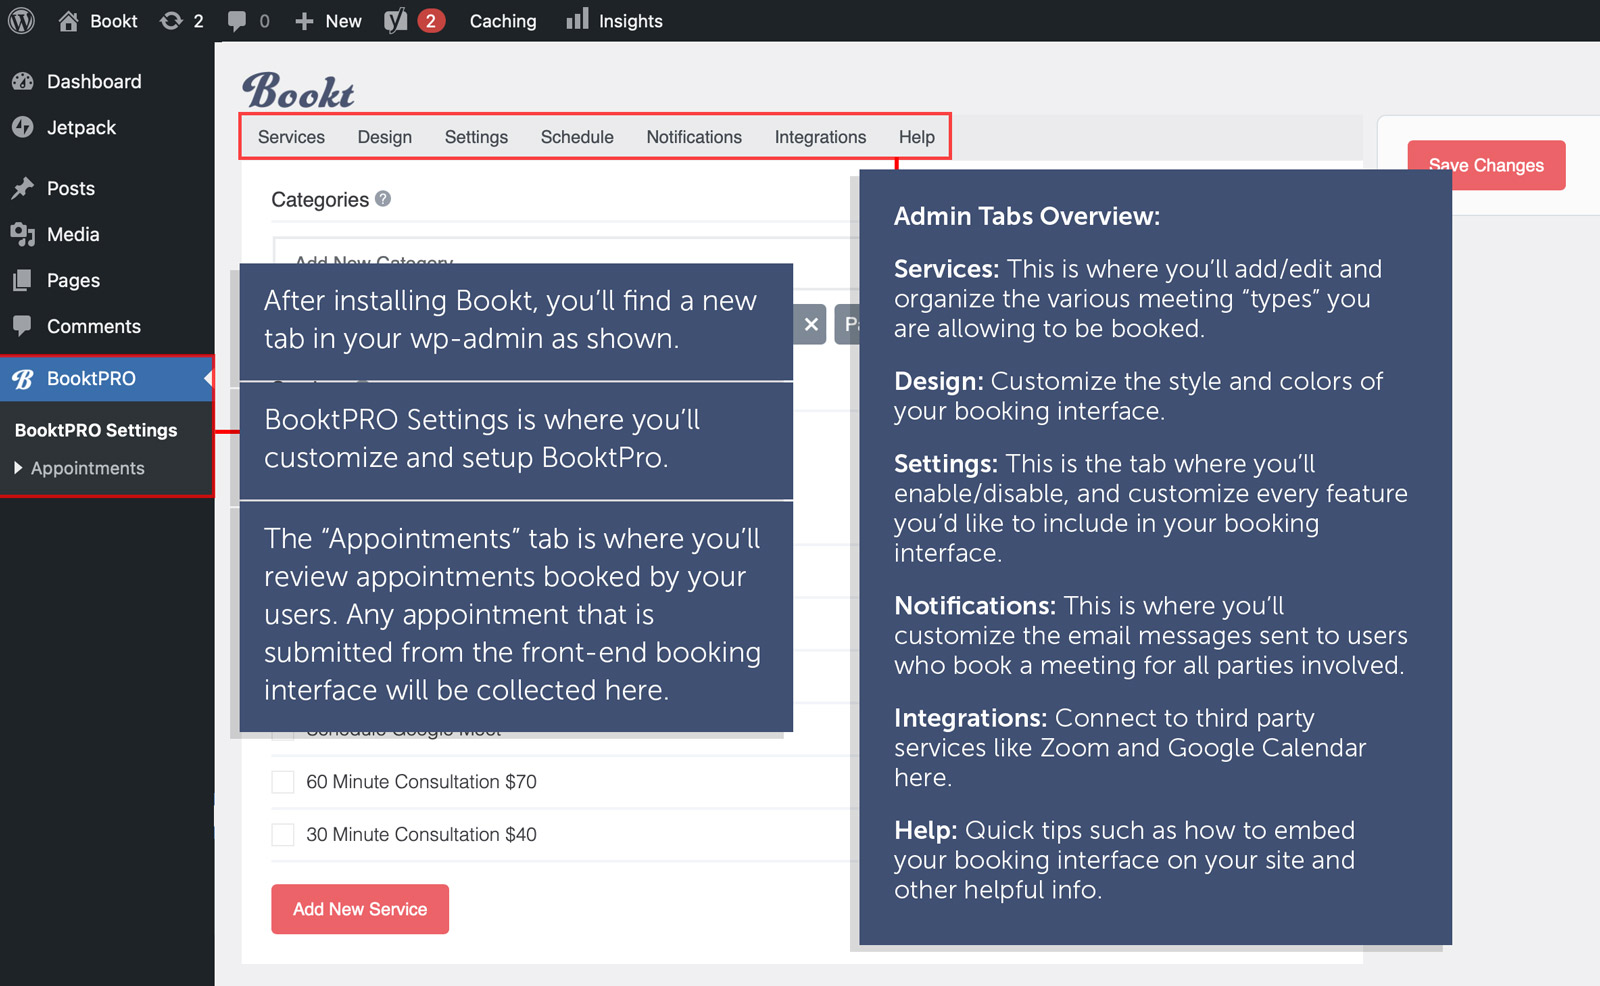
Admin Tabs Overview:
Services: This is where you’ll add/edit and organize the various meeting “types” you are allowing to be booked.
Design: Customize the style and colors of your booking interface.
Settings: This is the tab where you’ll enable/disable, and customize every feature you’d like to include in your booking interface.
Notifications: This is where you’ll customize the email messages sent to users who book a meeting for all parties involved.
Integrations: Connect to third party services like Zoom and Google Calendar here. Help: Quick tips such as how to embed your booking interface on your site and other helpful info.
Now that you’re familiar with the general components that makeup the plugin’s admin area, we’ll now dig into each tab in detail, starting with the “Services” tab.
Services Tab (How to Add Services/Meeting Types)
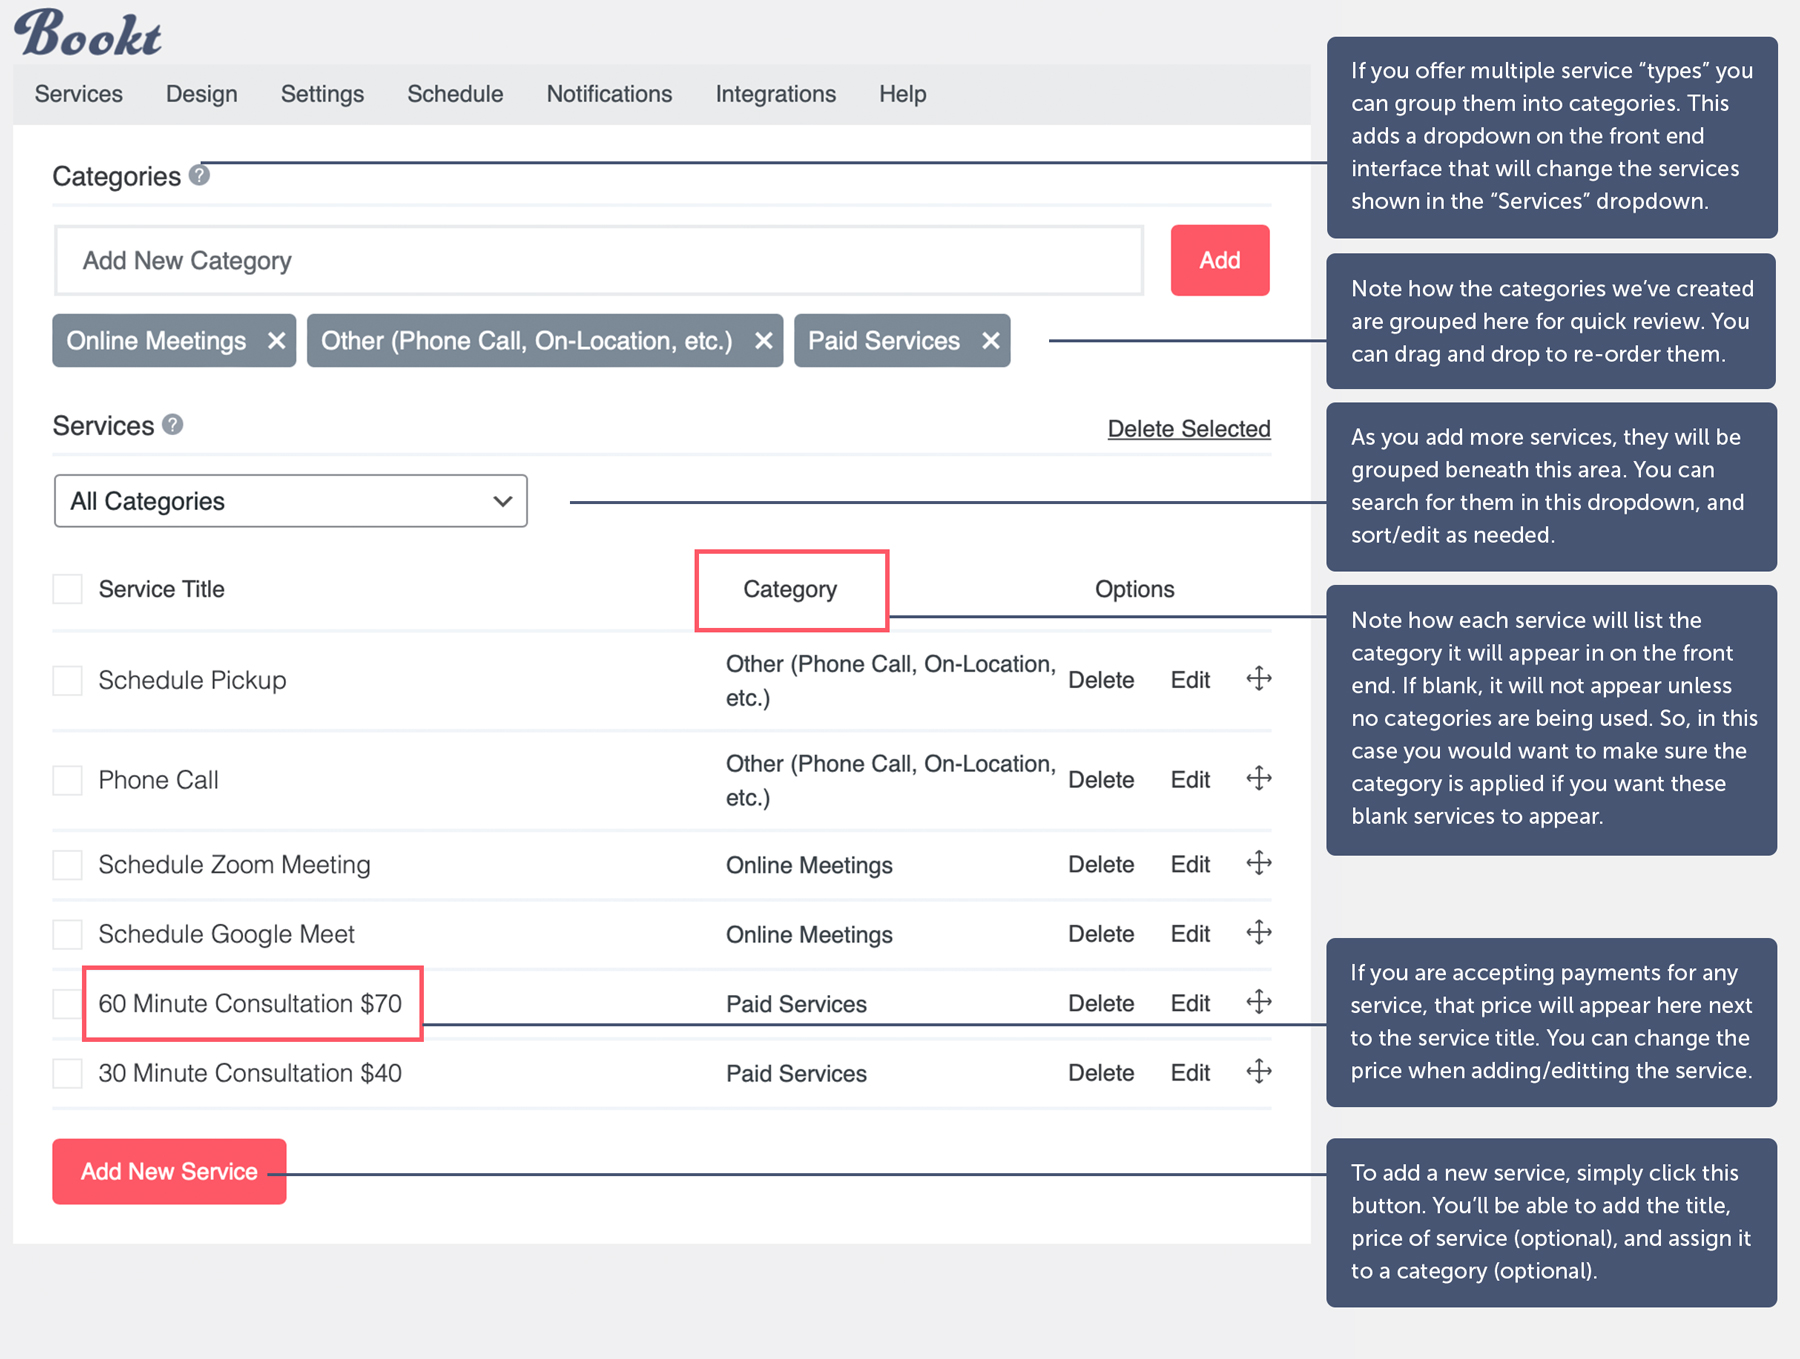
The Services tab is where you’ll organize all of the services you would like to add that can be booked by customers/clients of your site. Bookt allows an endless range of possible services, including the ability to book Zoom meetings via calendar, book phone meetings based on your schedule, offer items for a scheduled in-store pickup, appointments for services like salon and barber bookings, and more. With the ability to categorize your services, customers will be able to pick whether they’d like to book a service, or simply schedule a phone call. Due to its modular nature, Bookt can be adapted to multiple tasks to help you run your business.
Below you will find an in depth overview of the Services tab, which is a great place to start when setting up your booking interface:
As you can see above, you have the optional ability to charge for any service you like. This lets customers securely pay for the service during the booking process. Note that you must have a Stripe account to accept payments, and a secure site (https: via a SSL certificate). Please contact your host for more details on ensuring your site has an SSL certificate installed, otherwise let’s move on to a quick overview of how the pricing is added along with other details when adding a new service:
Adding a New Bookable Service
To add a new service, simply click the “Add New Service” button found on the Services tab page. This will bring up the following popup, which allows you to enter the details of the service you’d like customers to be able to book:
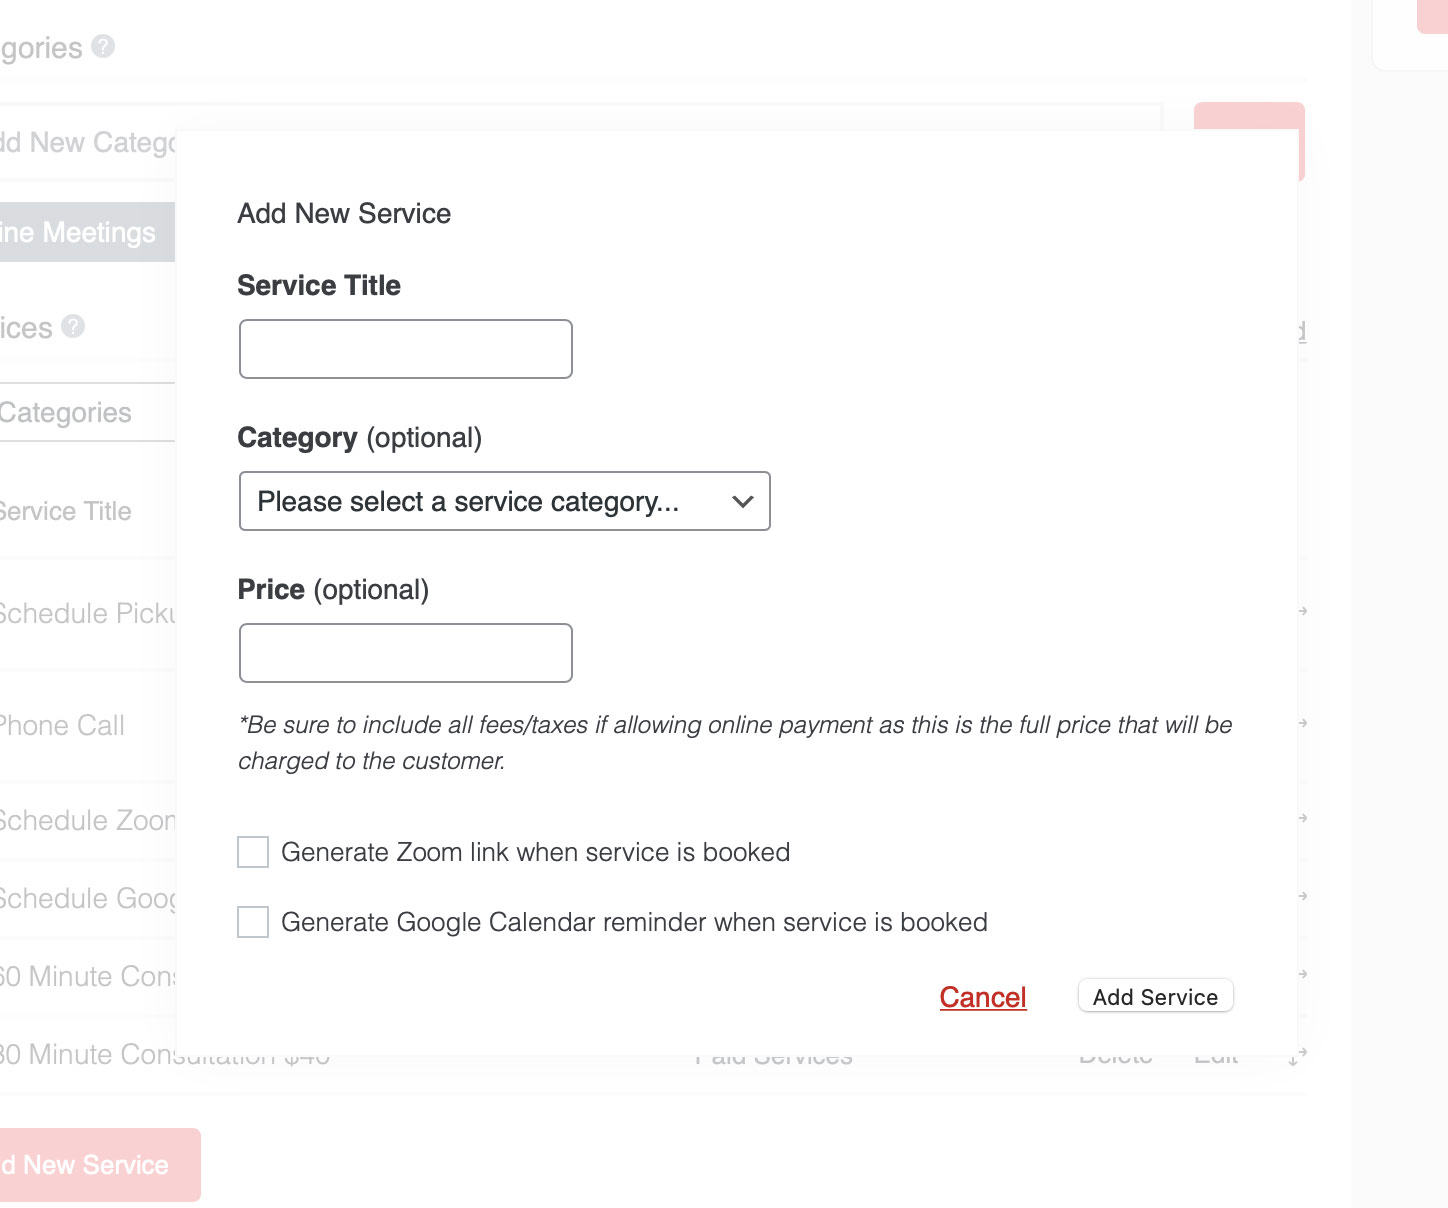
The popup is very straight forward, but here are a few clarifications of each field that needs to be entered before adding the service:
Service Title: This is of course the title of the service that can be booked.
Category: This will only apply if you have multiple service “types” such as phone calls vs. paid appointments. If you have already added categories, you can assign this service as needed via this dropdown. On the front end, users will select the category in a dropdown, which will then dynamically update the services shown in the “Services” dropdown.
Price: This is optional for each service you offer, and allows you to specify how much will be collected if this service is selected. Note you can let customers pay during the booking process, via invoice, or on location. Each of these options can be displayed to customers, allowing them to choose their payment method, or you can specify/require a certain payment method. It’s all up to you. Please see the “Settings” tab section for more details on how to enable various payment methods, including the ability to accept online payments via Stripe.
Generate Zoom Link/ Google Calendar Reminder: These settings allow the auto-generation of a Zoom meeting link, and/or the ability to add the booked appointment to the user’s Google Calendar. Check each that applies to this specific serivce.
Note: Bookt supports multiple currencies, which can be set in the Settings Tab. Once set, the proper Currency symbol will display in the Services section as well as on the front end interface, and visitors will be charged according to the currency you’ve set.
***As noted in the “Add Service” popup, you’ll want to account for all taxes and fees when entering this price, as this will be the full amount that is collected. No taxes or other fees will be generated beyond what you enter in this field.
Once you’ve entered the details for this specific service, click “Add Service” and you’re all set! This service is ready to be booked by your site visitors.
Design (Customize Colors)
Our Software is designed with minimalism in mind, with a clean, simple look that is crafted to ensure your customers/clients can quickly book an appointment in a matter of seconds. Despite the nearly universal design, our software lets you customize the colors of your booking interface to match your site and brand. Check out an overview of the Design tab below to see how you can easily alter the colors of your booking interface in a few clicks. Note that we have color coded the admin setting and matched it to the area effected on the front end portion. Feel free to open this image in a new tab for a closer view:
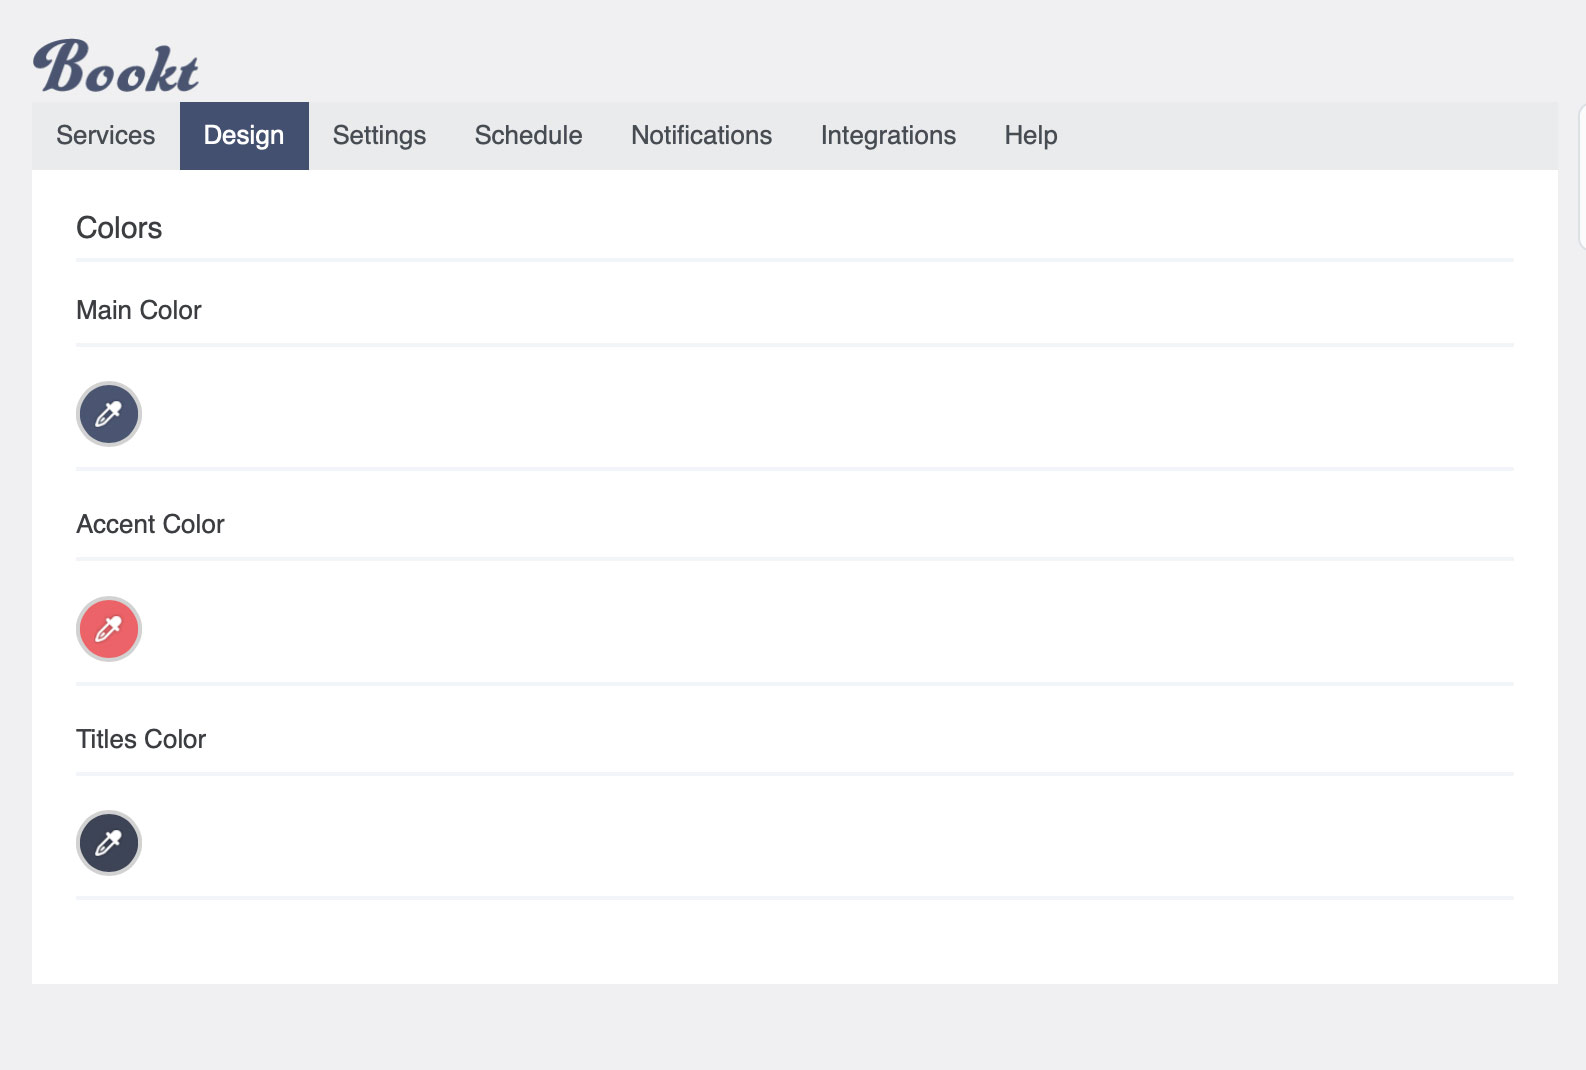
As with all tabs, once your colors are in place, click the “Save” button in the right sidebar to apply your changes.
Settings (Where to Customize Features)
The settings tab is where you’ll decide which feature to include/exclude on your front-end booking interface. Content that can be added or omitted includes form fields for collecting customer information, the ability to accept online payments, the option to categorize multiple services (or simply have a single service), and more. In short, you’ll be able to craft the perfect booking process that only collects what you need from customers. It can be as simple or as robust as you need, from a simple meeting booking plugin, or a booking plugin for multiple services and purposes. For example, maybe you’d like to offer online counseling sessions that can be paid for online during the booking process, but also want the ability for clients to schedule free phone calls? Our Software can take care of that in a single interface, ensuring that your schedule is organized with no conflicts amongst appointments.
Below you’ll find an in-depth overview of each feature, though note the Settings tab also contains inline help text to clarify exactly what is being added when you select each option. This help text is found by clicking the small “?” icons next to each option.
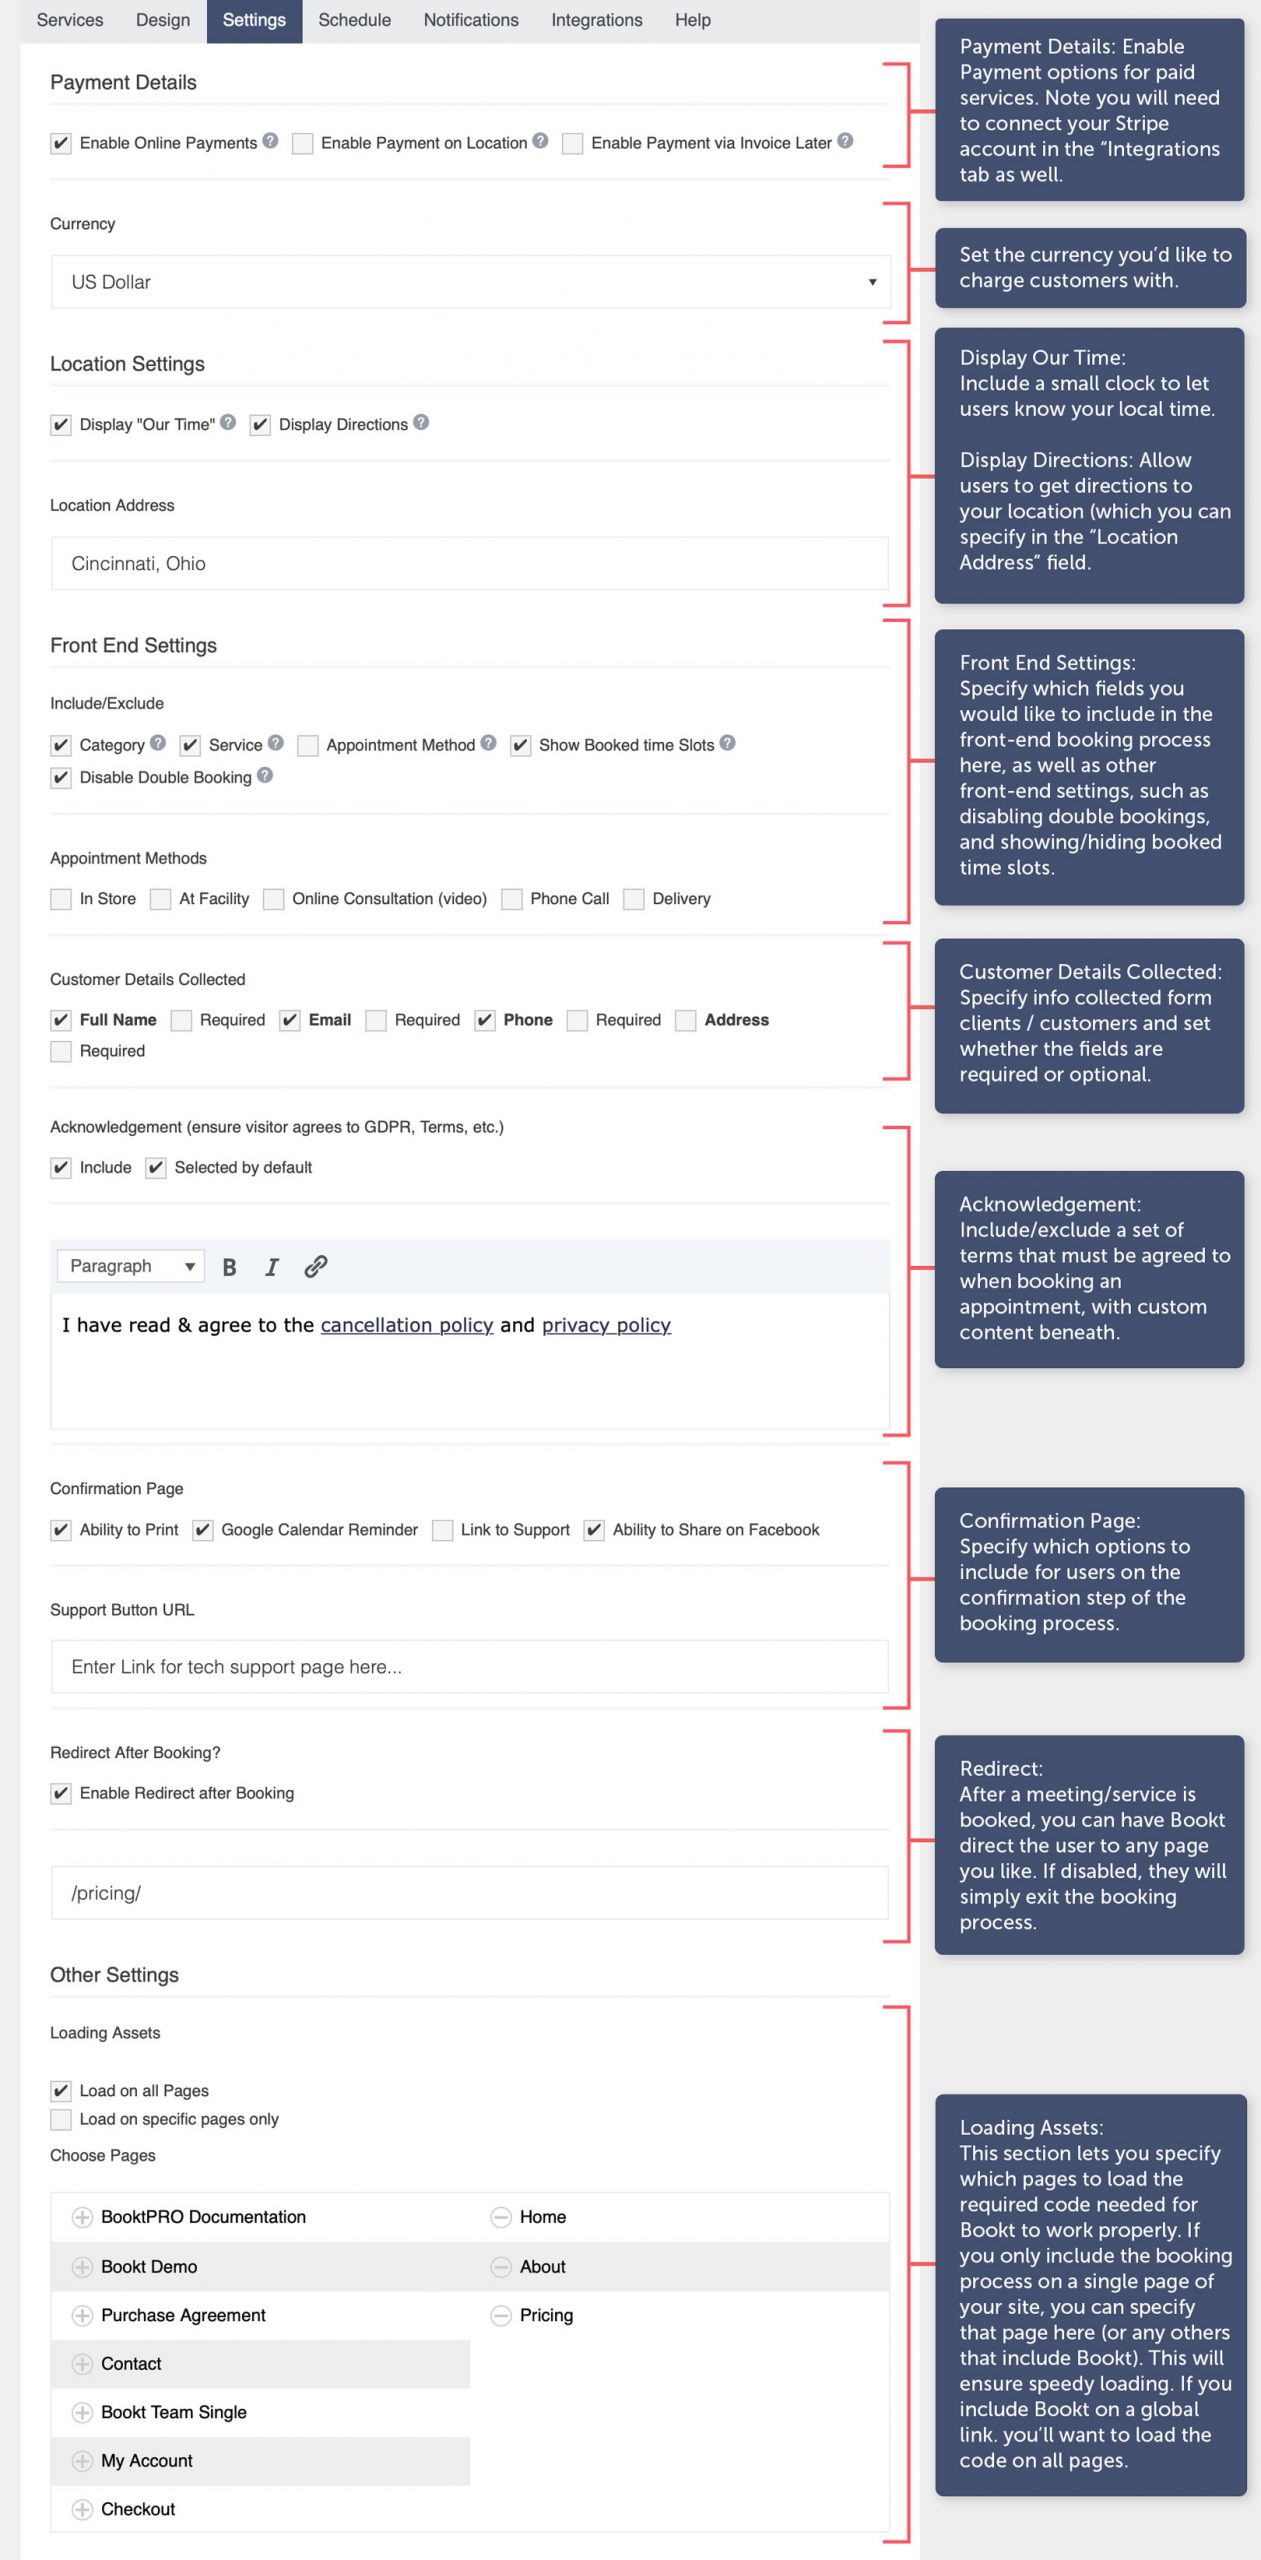
As with all tabs, once your settings are in place, click the “Save” button in the right sidebar to apply your changes.
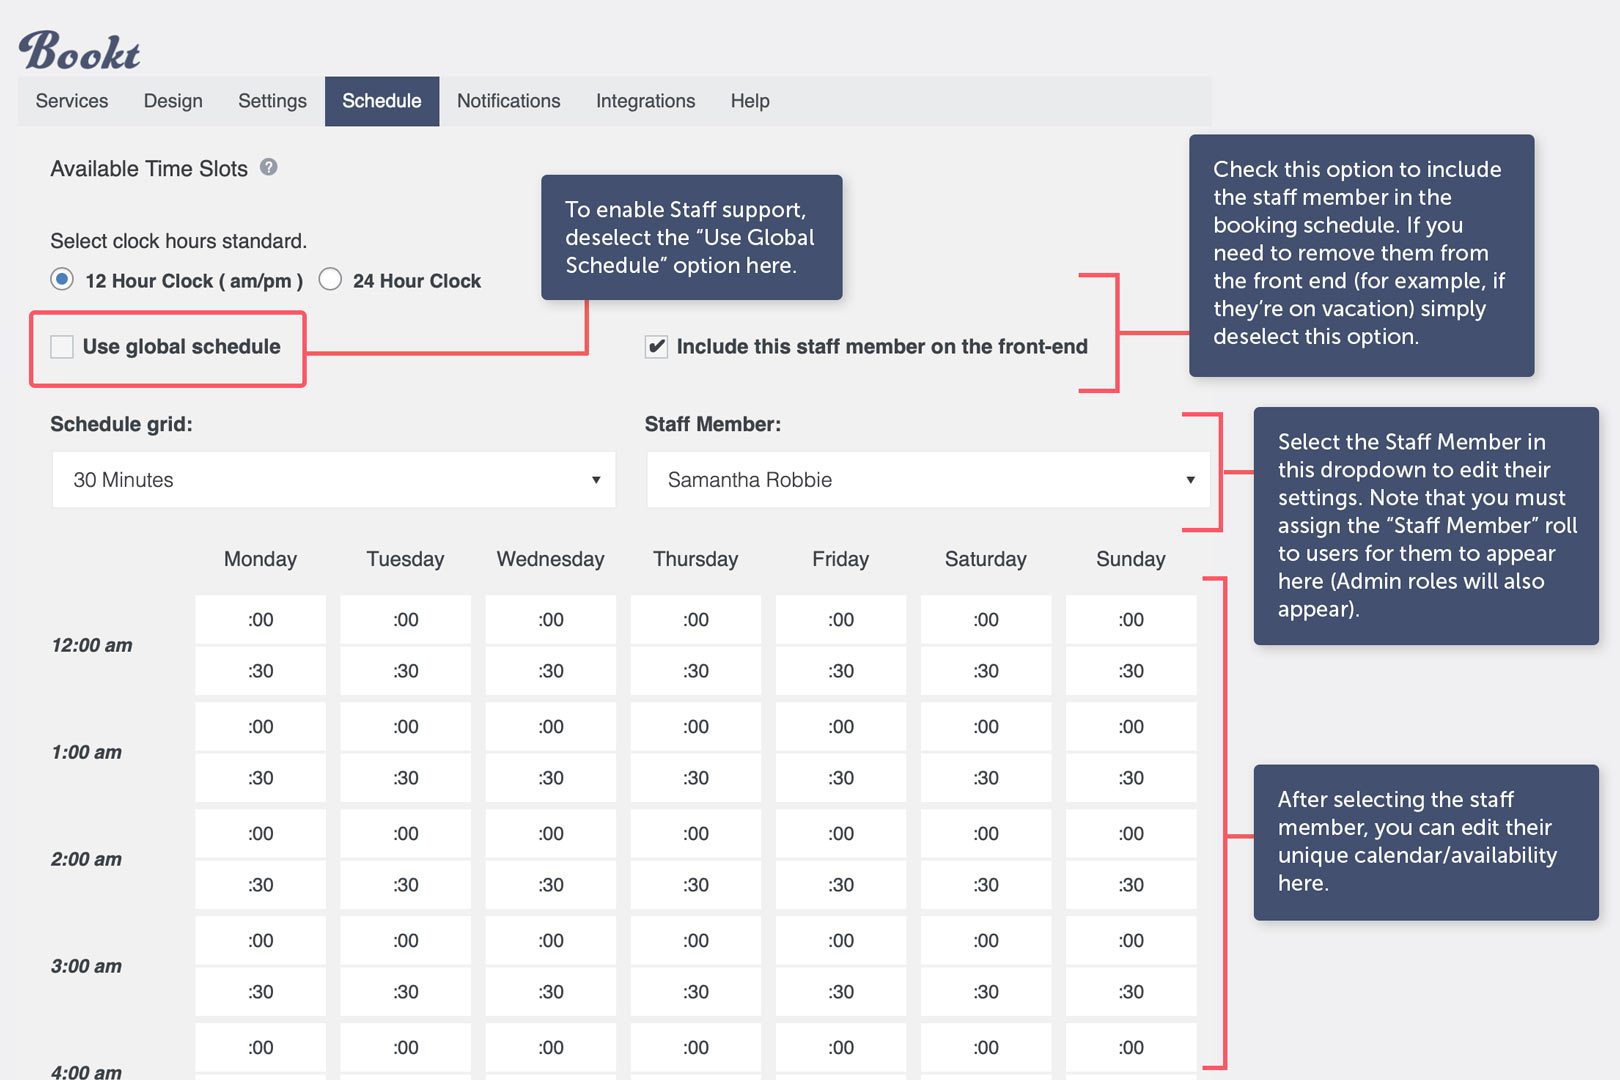
Schedule (Setting Availability)
In this section you can specify each time slot that can be booked on a central “Global Schedule” as well as enabling staff member support (optional). This can be divided into increments of 15, 30, 60, 120 and 240 minutes, allowing you to be as granular as you like depending on the services you offer. By default, your availability will be blank. To add slots, simply select the increment, then click each time slot you’d like to make available. This will automatically add them to the front-end booking interface for customers/clients.
If you only want a single calendar (ie for booking meetings/services only for the admin, our “You”) then you’ll want to select the “Use Global Schedule” option. Deselect this if you prefer to allow bookings for multiple staff members (more on this later).
Here is a detailed overview of the Schedule tab to showcase how simple it is to set your weekly/daily availability:
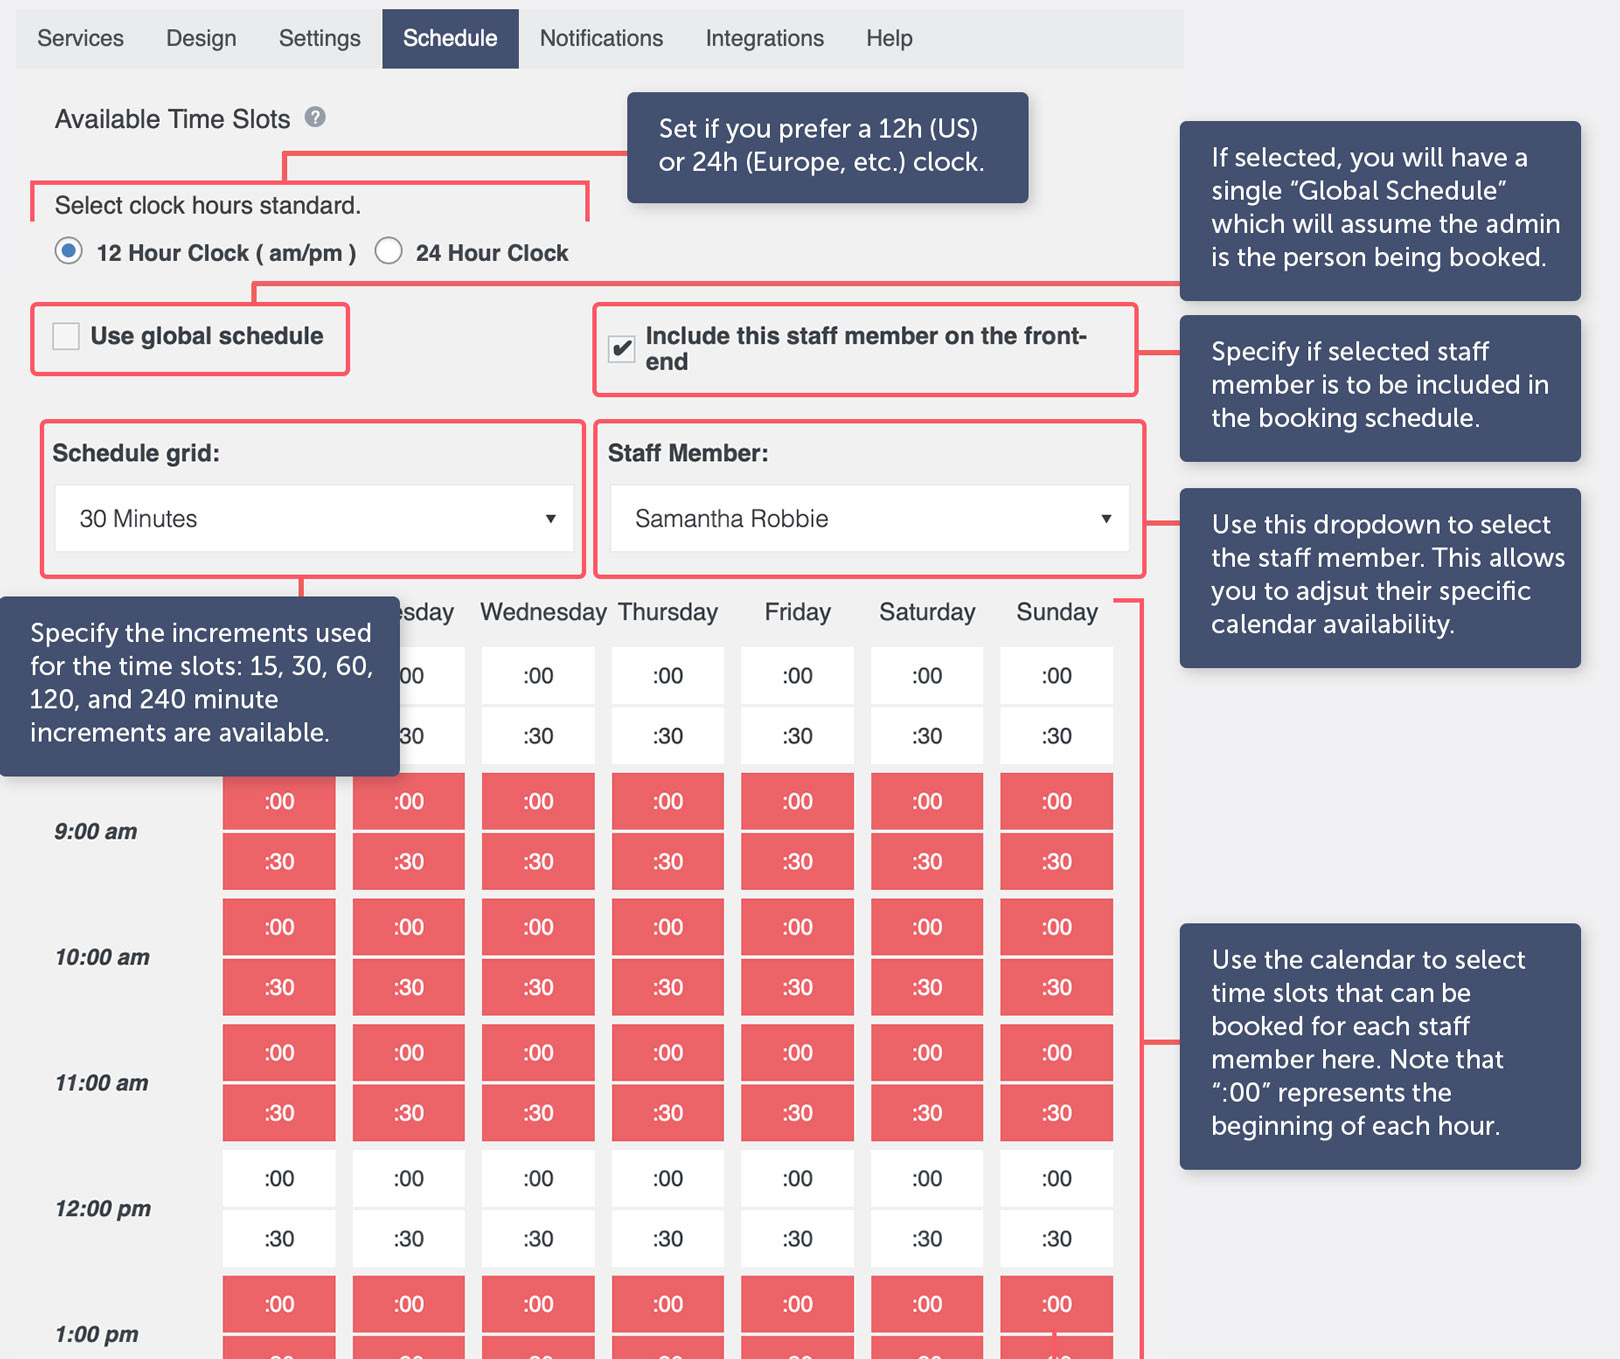
Note: When selecting “00:” it will be for the first portion of the hour, ie “00:” in a 30 minute time slot next to “2:00 PM” will book the 2:00-2:30 time slot. Selecting “30:” will book from 2:30-3:00 and so on.
Staff Members: If you have a staff that you’d like to be able to enable booking for, you can enable this option by deselecting the “Use Global Schedule” option. By deselecting that option, it will open the Staff Member interface, allowing you to add available time slots on each staff members’ unique schedule. Please see the “Staff Member Feature Overview” section lower in this documentation for details.
Email Notifications
In this section you can specify the message that is sent both to the visitor who makes the appointment, and the admin/staff member who the appointment has been booked with. These two messages are contained in the “Notifications” tab, as shown here:
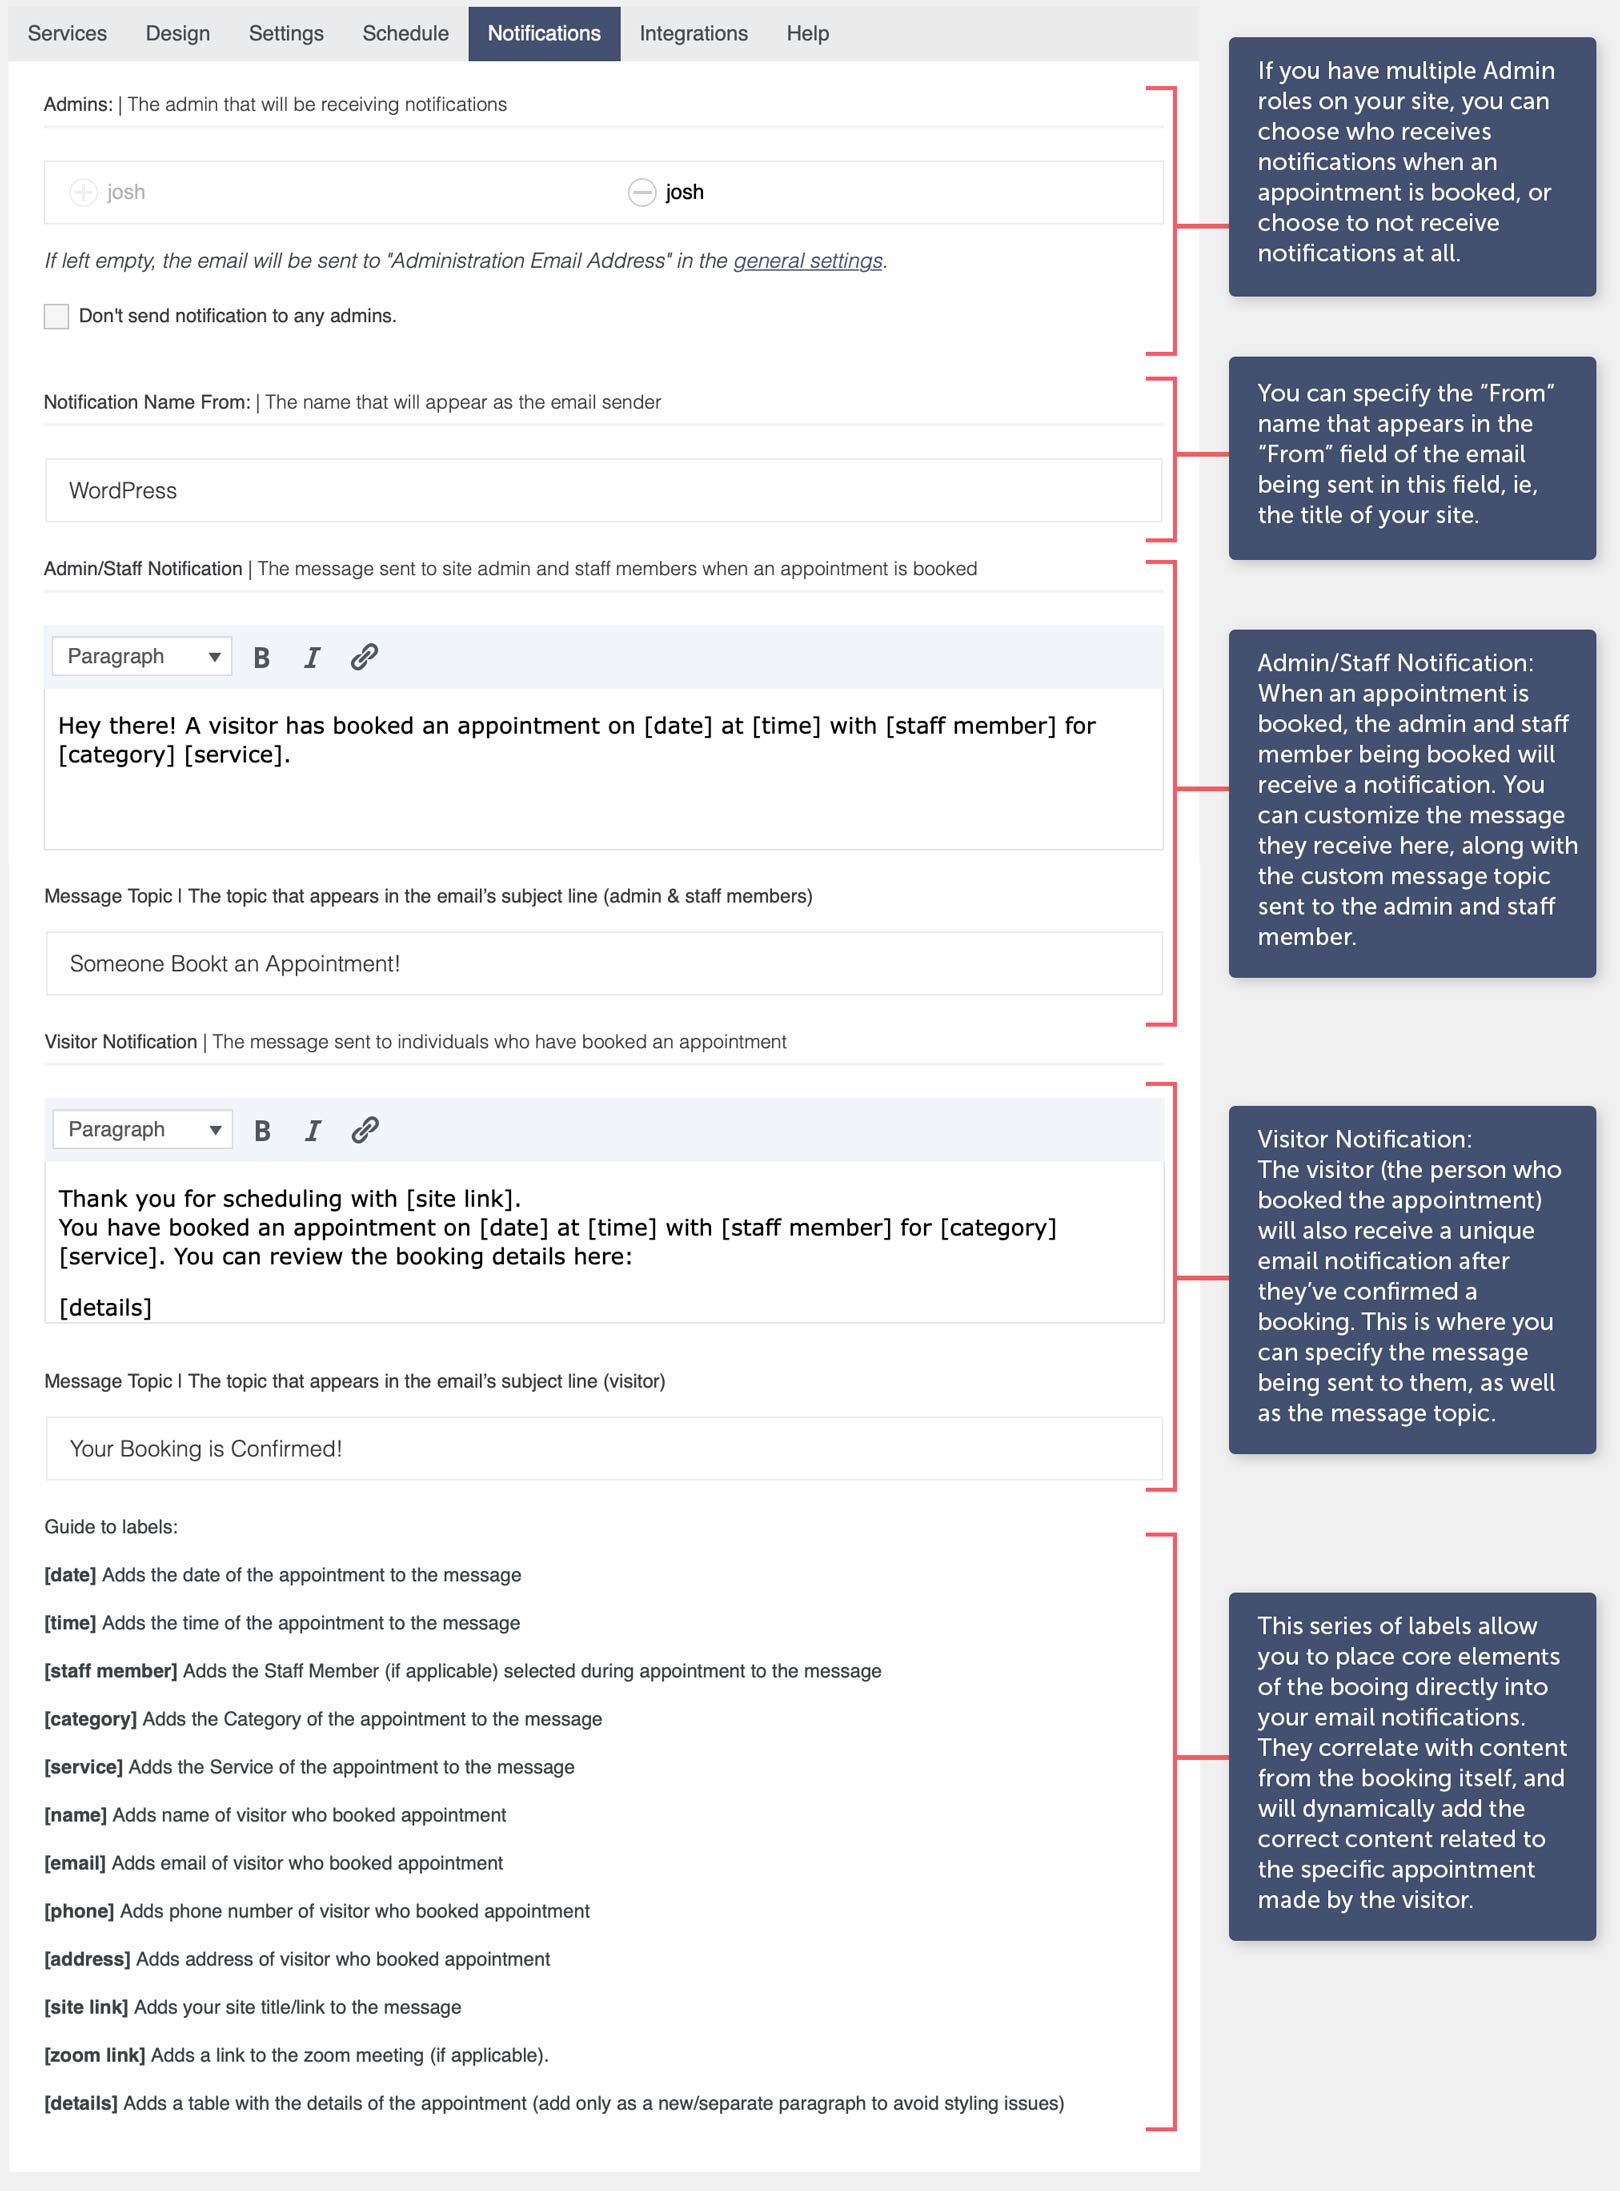
As you’ll see, a series of shortcodes can be combined to enhance your message with specific details about the appointment. A default message will be entered automatically, but change these as needed for a fully custom message to your staff and clients/customers so they stay informed.
Integrations (Google Calendar & Zoom Setup)
This is where we store any settings related to 3rd party services, such as Google Calendar, Payment accounts, and connecting a Zoom account for generating Zoom meeting links. It’ll look like this:
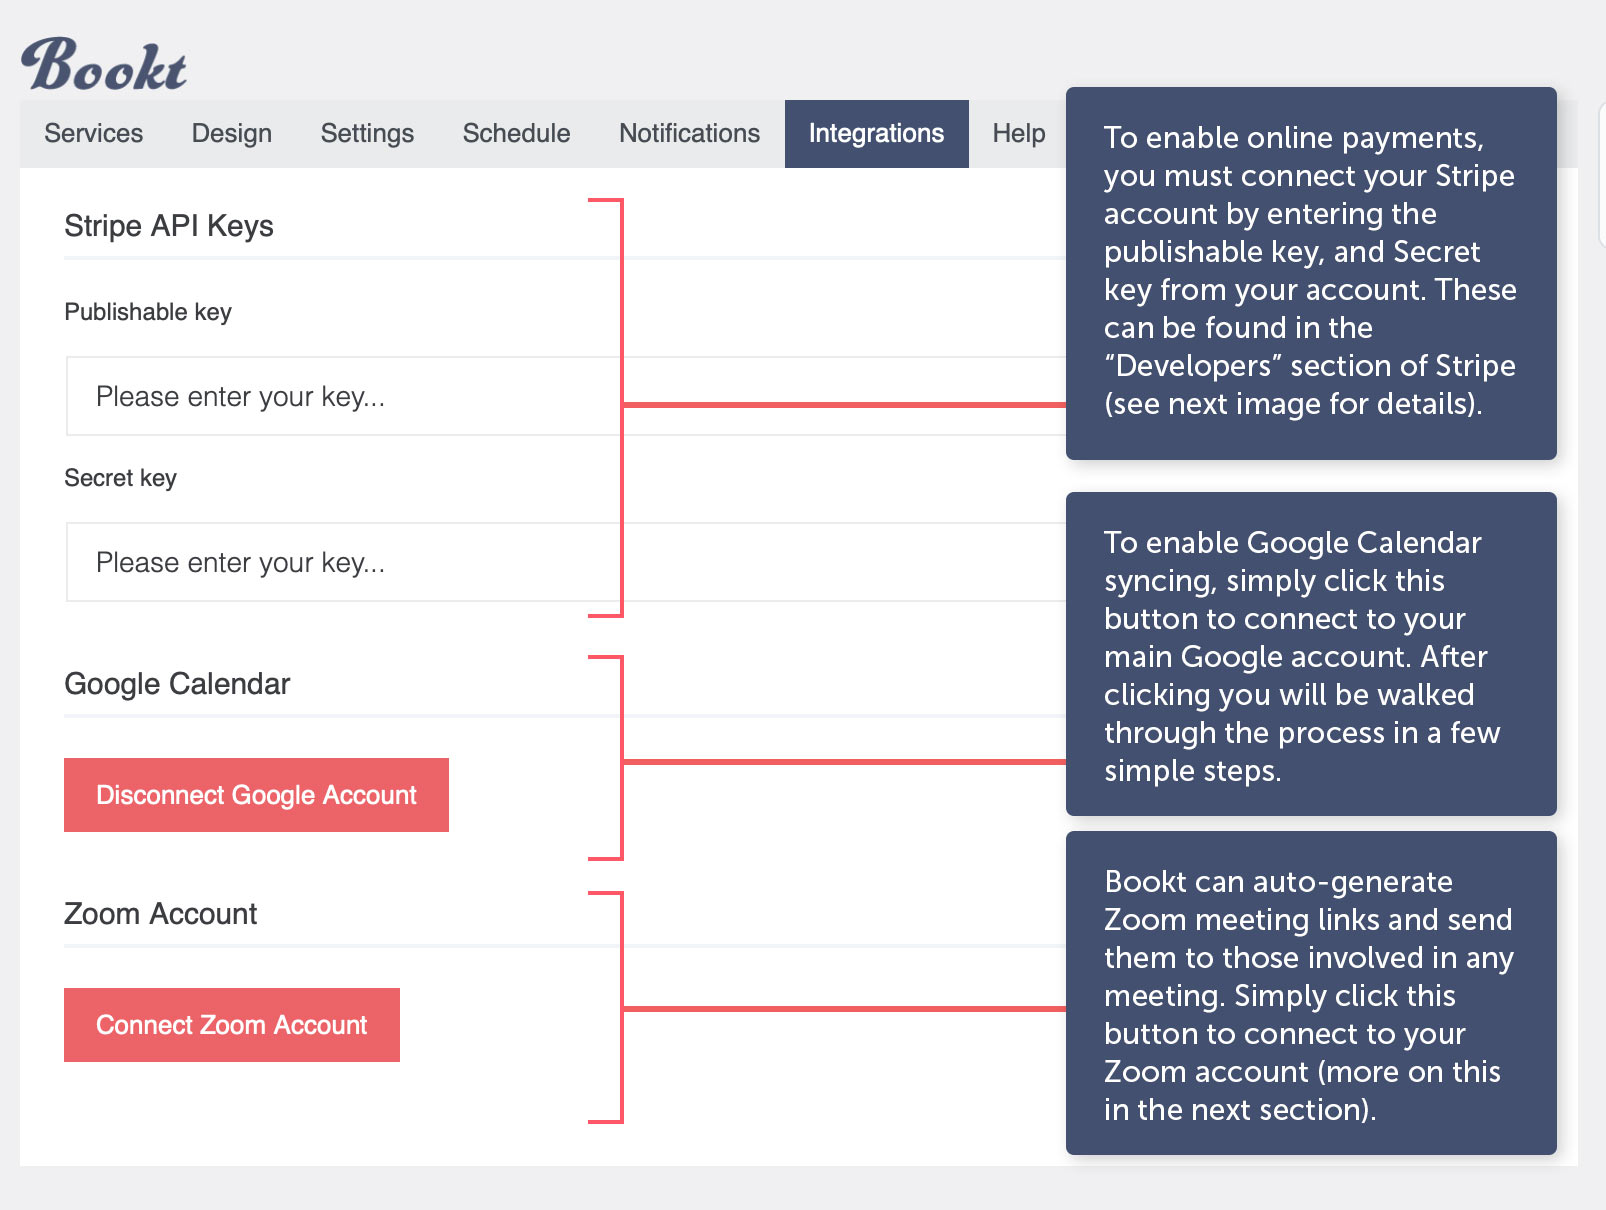
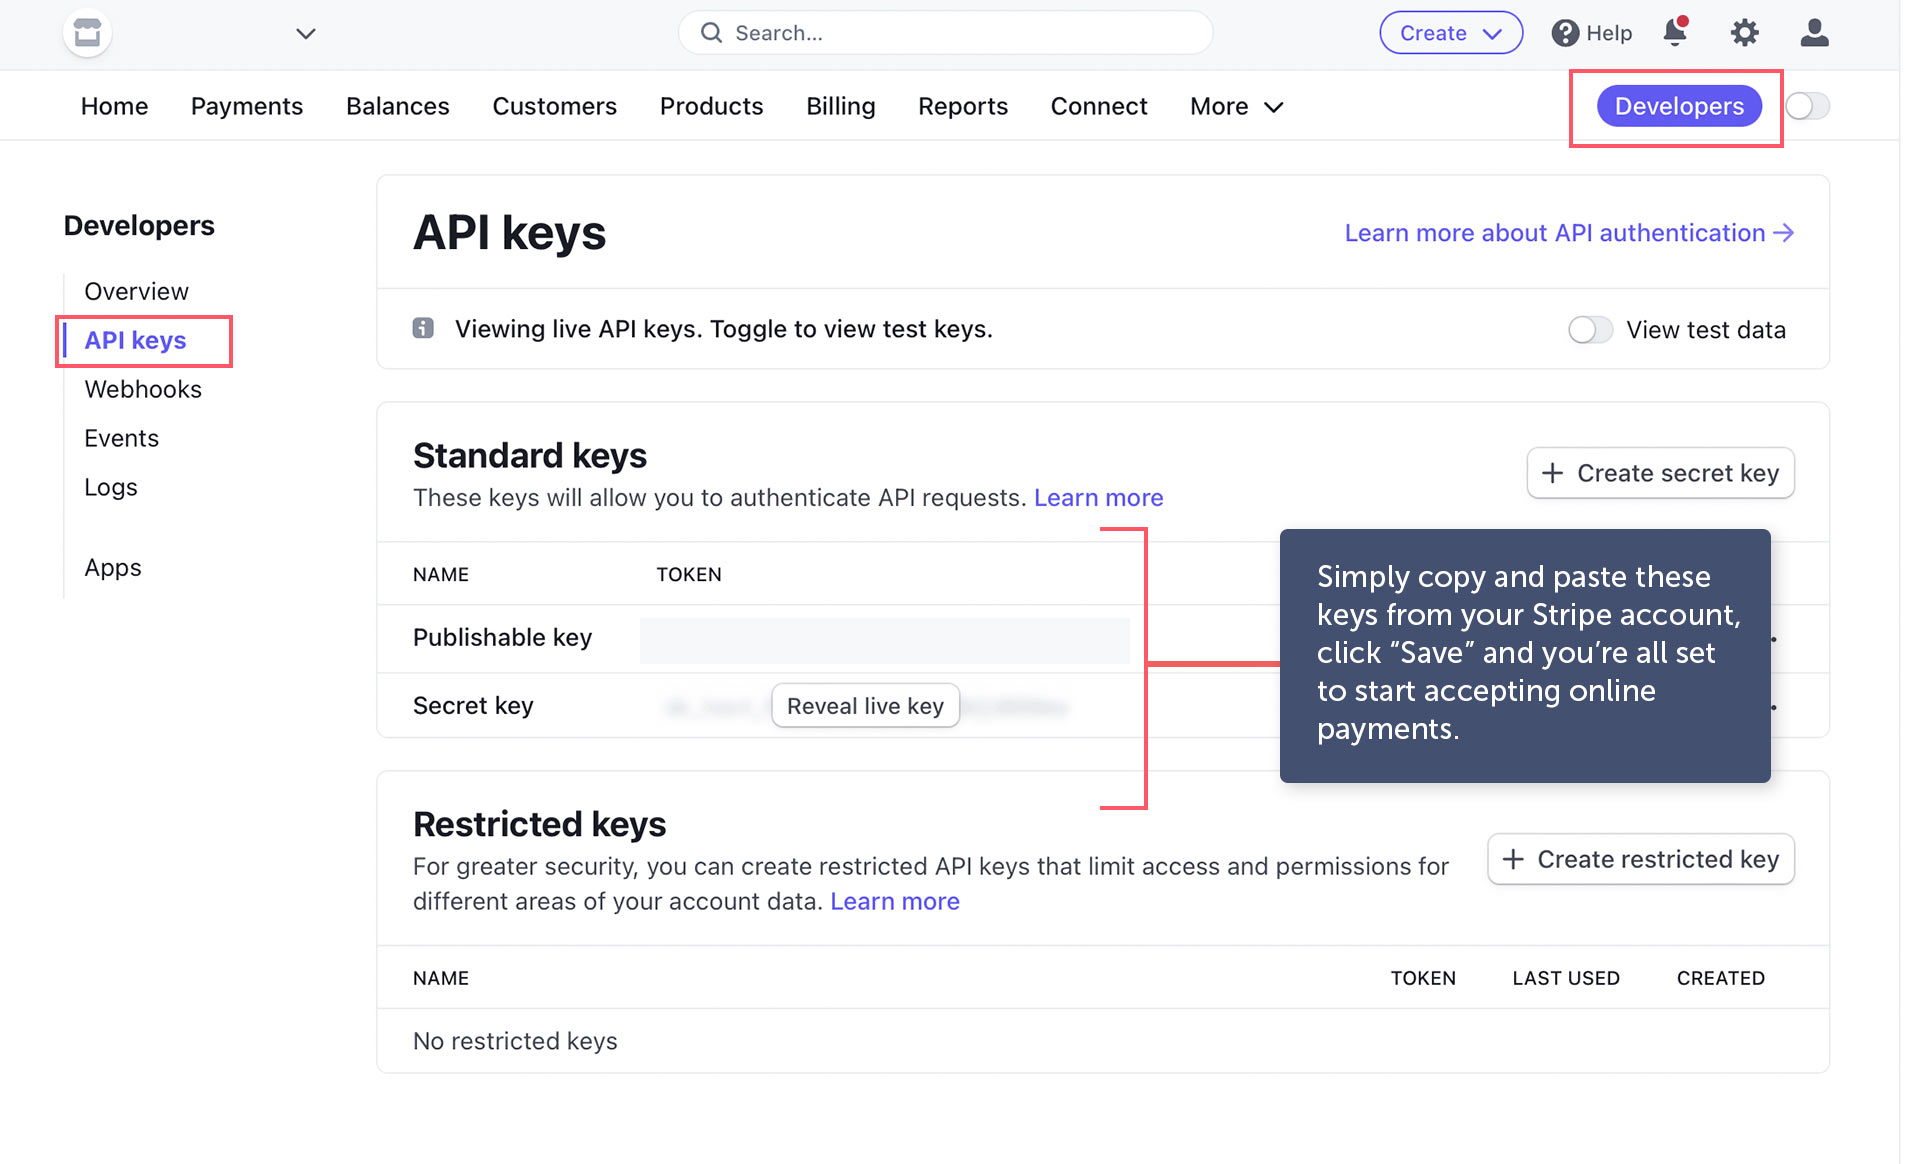
Stripe API Keys
This allows you to enter credentials from your Stripe account in order to receive payments when a user books an appointment/service. You can do so by accessing your Stripe account’s “Developer” section, as shown here:
Google Calendar:
This is where you’ll enable Google Calendar, which allows users to add any appointments directly to their Google Calendar while booking an appointment. By syncing with your Google account, we take all of the trouble out of syncing with your personal calendar with a click of a button. Simply click “Connect Google Account,” log into your Google account that you’d like to associate with the appointments being booked, and you’re done!
Zoom Account:
Our software fully integrates with Zoom, allowing automatic Zoom links to be generated and sent to all parties involved in any booked appointment. This means that users booking an appointment will automatically generate a Zoom meeting link, which will then be sent to all parties involved in the meeting. We cover this in the next section of this documentation.
Zoom Setup Detailed Instructions
Using Zoom: Once enabled, users who book an appointment will automatically generate a Zoom meeting link, which will then be emailed to all parties involved in the meeting. After you’ve setup a Zoom account, connecting your account is literally the click of a button, and we’ll cover the setup process below.
Prerequisites: You will need a Zoom account in order to use this feature, and will need to be logged in.
Zoom Setup:
1. Navigate to the Integrations tab
As shown in the previous step of this documentation, you’ll find the Zoom account settings in the “Integrations” tab of Brindle Booking’s admin area. Once there, you’ll see a section at the bottom titled Zoom Account.
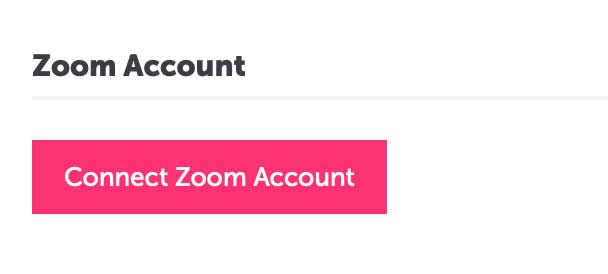
2. Connect Zoom Account
You guessed it, simply click that button. You’ll then be taken to your Zoom account login page (if not logged in already). Once logged into Zoom, Zoom will ask you to Authorize the app for use via a screen that looks like this:
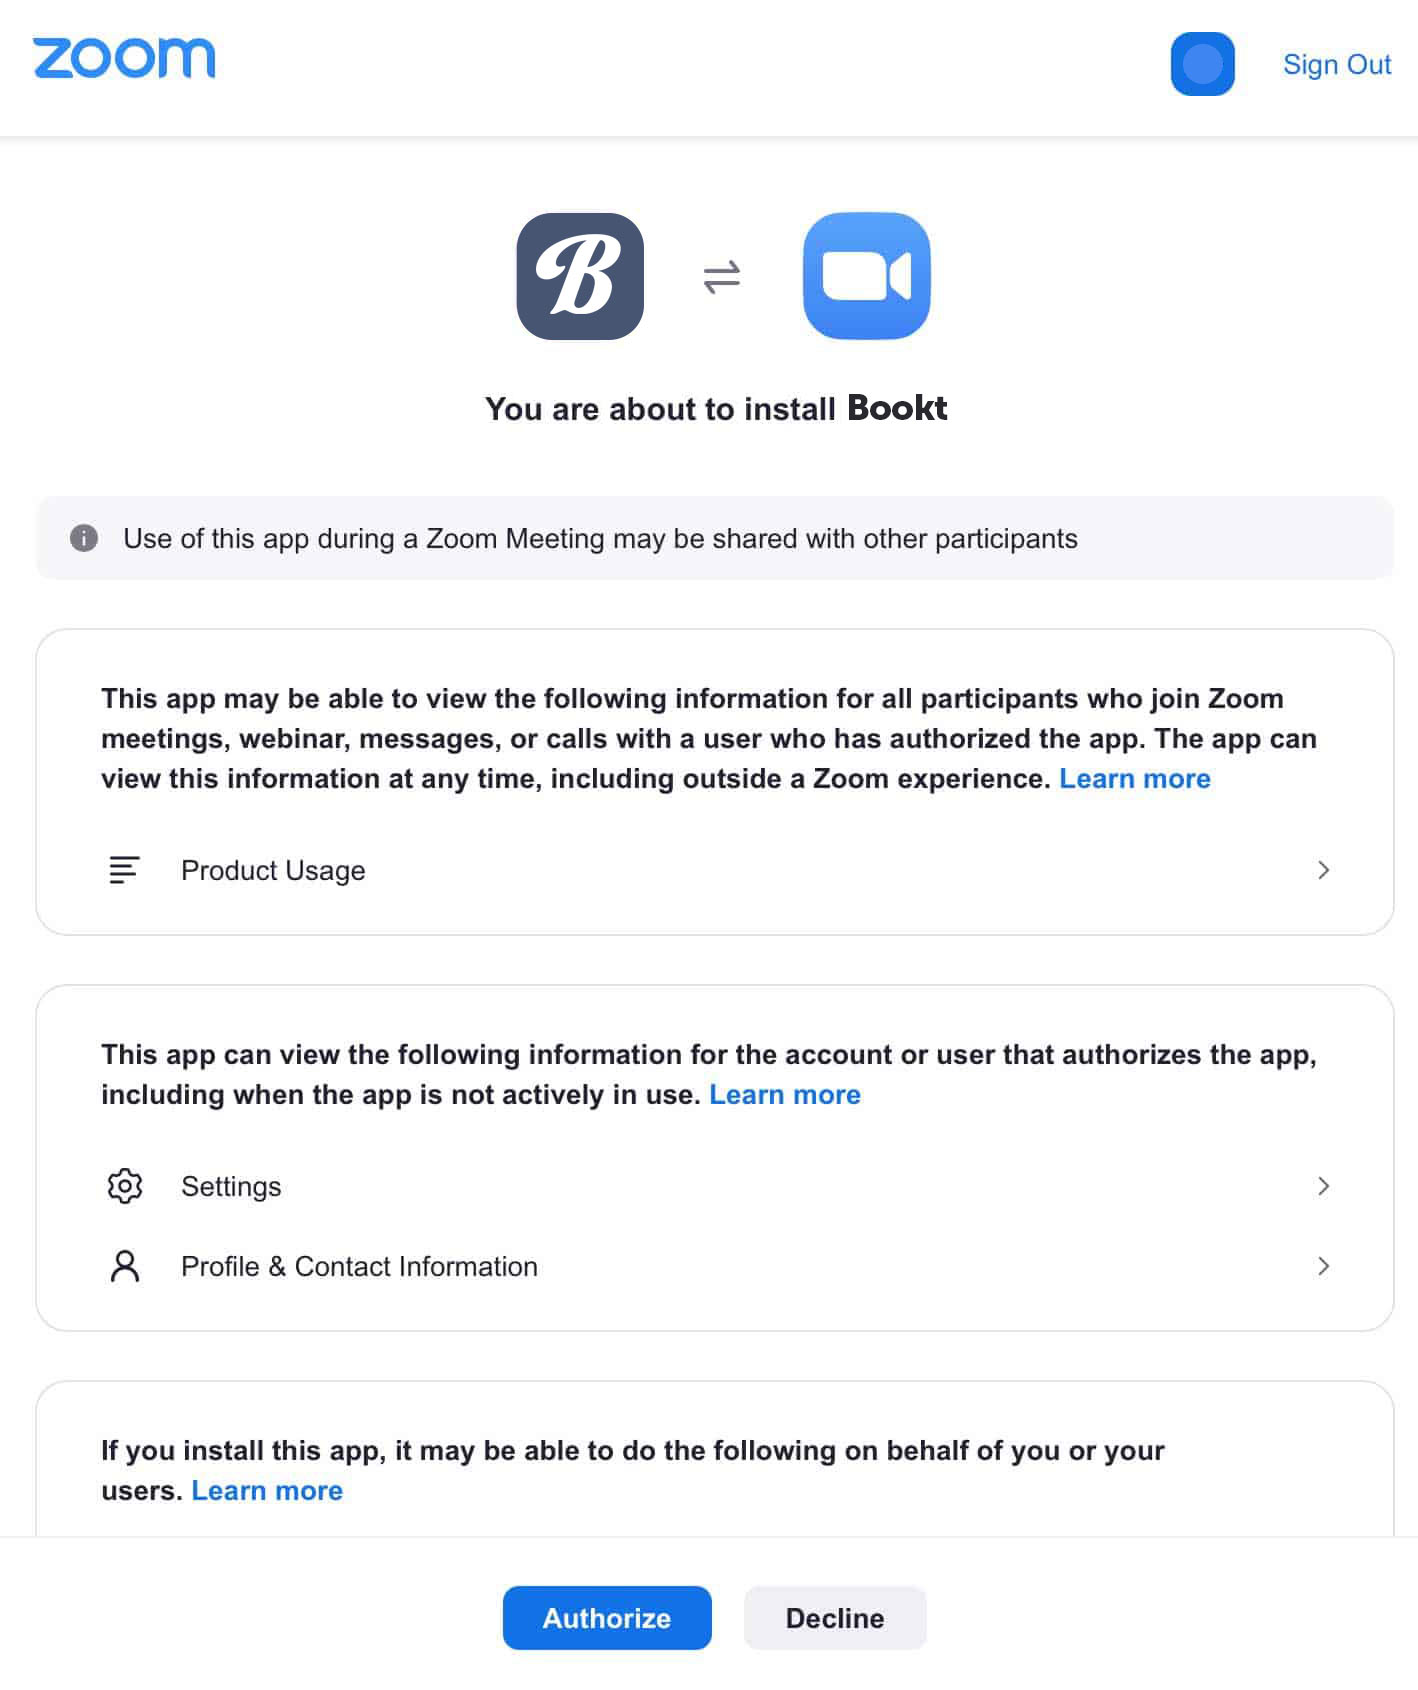
Click Authorize, and you’re all set to automatically let all of your users generate Zoom meeting links for any service you like, which takes us to the final step.
3. Enable Zoom Meeting Setting for Services
You have the option to include/exclude the Zoom functionality for any service you like. Simply navigate to the Services tab, and select any service you’ve created (or add a new one). In the popup that appears – which include the service details – you’ll now see a checkbox at the bottom titled “Generate Zoom link when service is booked”. It will look like this:
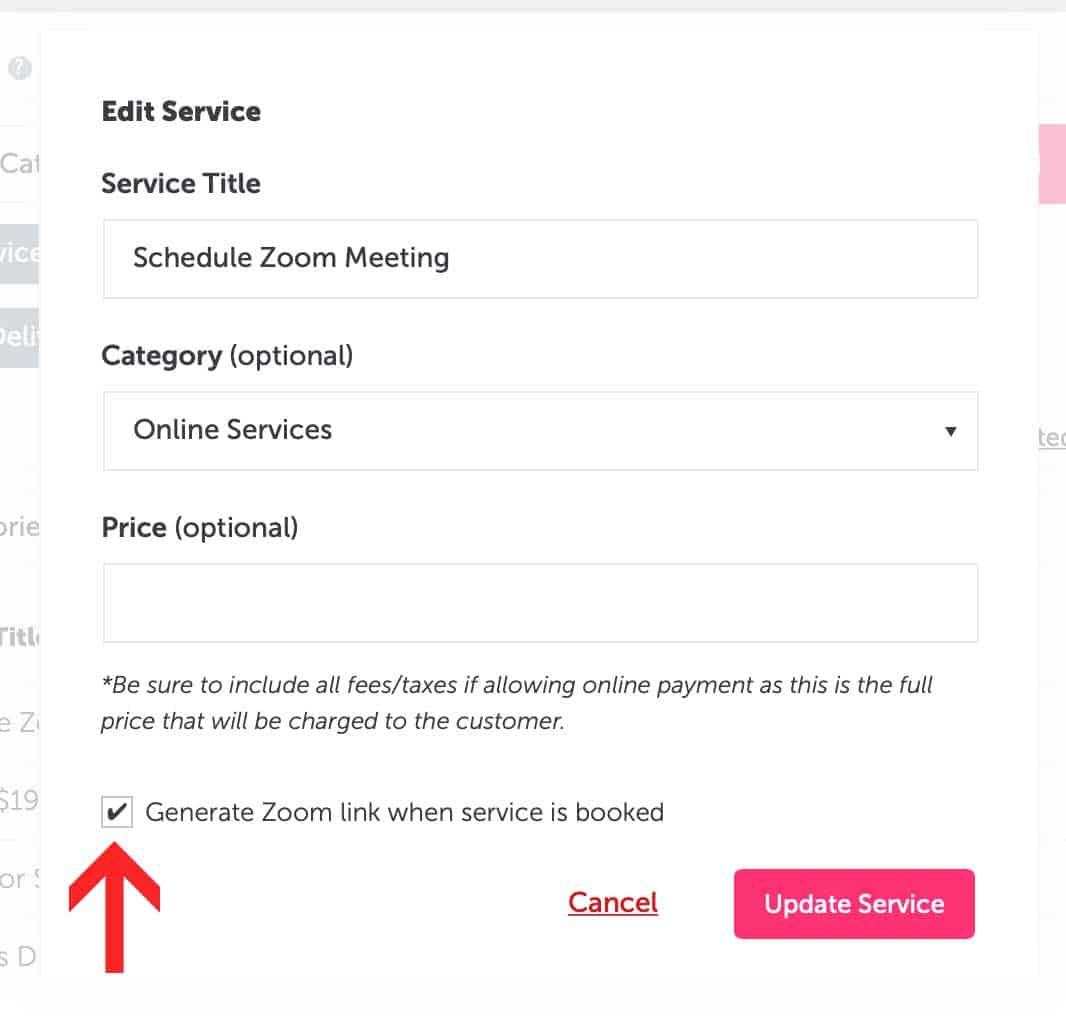
When that option is enabled, this specifiuc service will create and email a Zoom link to the person booking the service as well as the admin and/or staff member who was booked.
And with that, you’ve now enabled Zoom funcitonality for your services!
Note: We do not store any personal information in regards to any Zoom meeting. Zoom functionality is stored on a secure server and protected by transport layer security (TLS) 1.3. Feel free to review our privacy policy for more details.
Deactivating / Uninstalling Zoom
To deactivate Zoom from your account, simply click the same button you clicked to enable it:
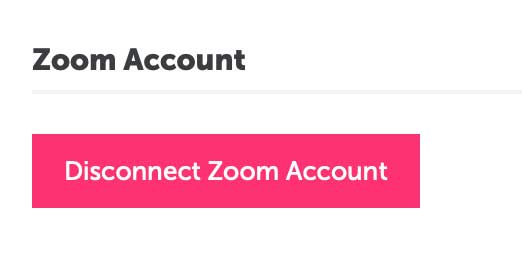
On clicking the “Disconnect Zoom Account” your booking software will no longer be linked to your Zoom account, and the functionality will be disabled.
Staff Member Feature Overview
With full staff support, clients/customers can book a specfic staff member from your team, each with their own booking schedule. Here are the key features:
Users with the Staff Member” role will be assigned their own account, and when they log in they will be able to edit/review their availability schedule and review appointments made only with them. While adding a staff member as a user, you’ll notice the new User role of “Staff Member” which is the role you’ll need to assign all staff members as in order to enable their booking calendar. We cover this in detail in the next section, which walks you through the process of adding a staff member.
While logged in, staff members can also review any appointments made with them from customers. They will only be able to see their own appointments in the Appointment tabs, where as the admin will be able to see ALL appointments made for all staff members.
The site admin can alter the schedule of any staff member, review appointments for all members, and also choose which members to include/exclude in the booking interface. This is all completed under the “Schedule” tab of the Bookt admin (see image above). The admin can also choose to omit Staff member support altogether by choosing the “Global Schedule” in the schedule tab. This will revert to a single booking schedule on the front-end interface.
You’ll find detailed instructions on setting up this feature in the next section of this documentation.
Adding Staff Members
To add a new staff member, there are 2 steps.
1. Create a new user:
Navigate to the “Users” tab in admin, and click “Add New”.
On the page that appears, you’ll add the member details such as name, email, and so on. Important: In the Role dropdown. a new role type has been added. Be sure to assign the role of Staff Member to this user, or they will not be added to Brindle Booking. See below for reference:
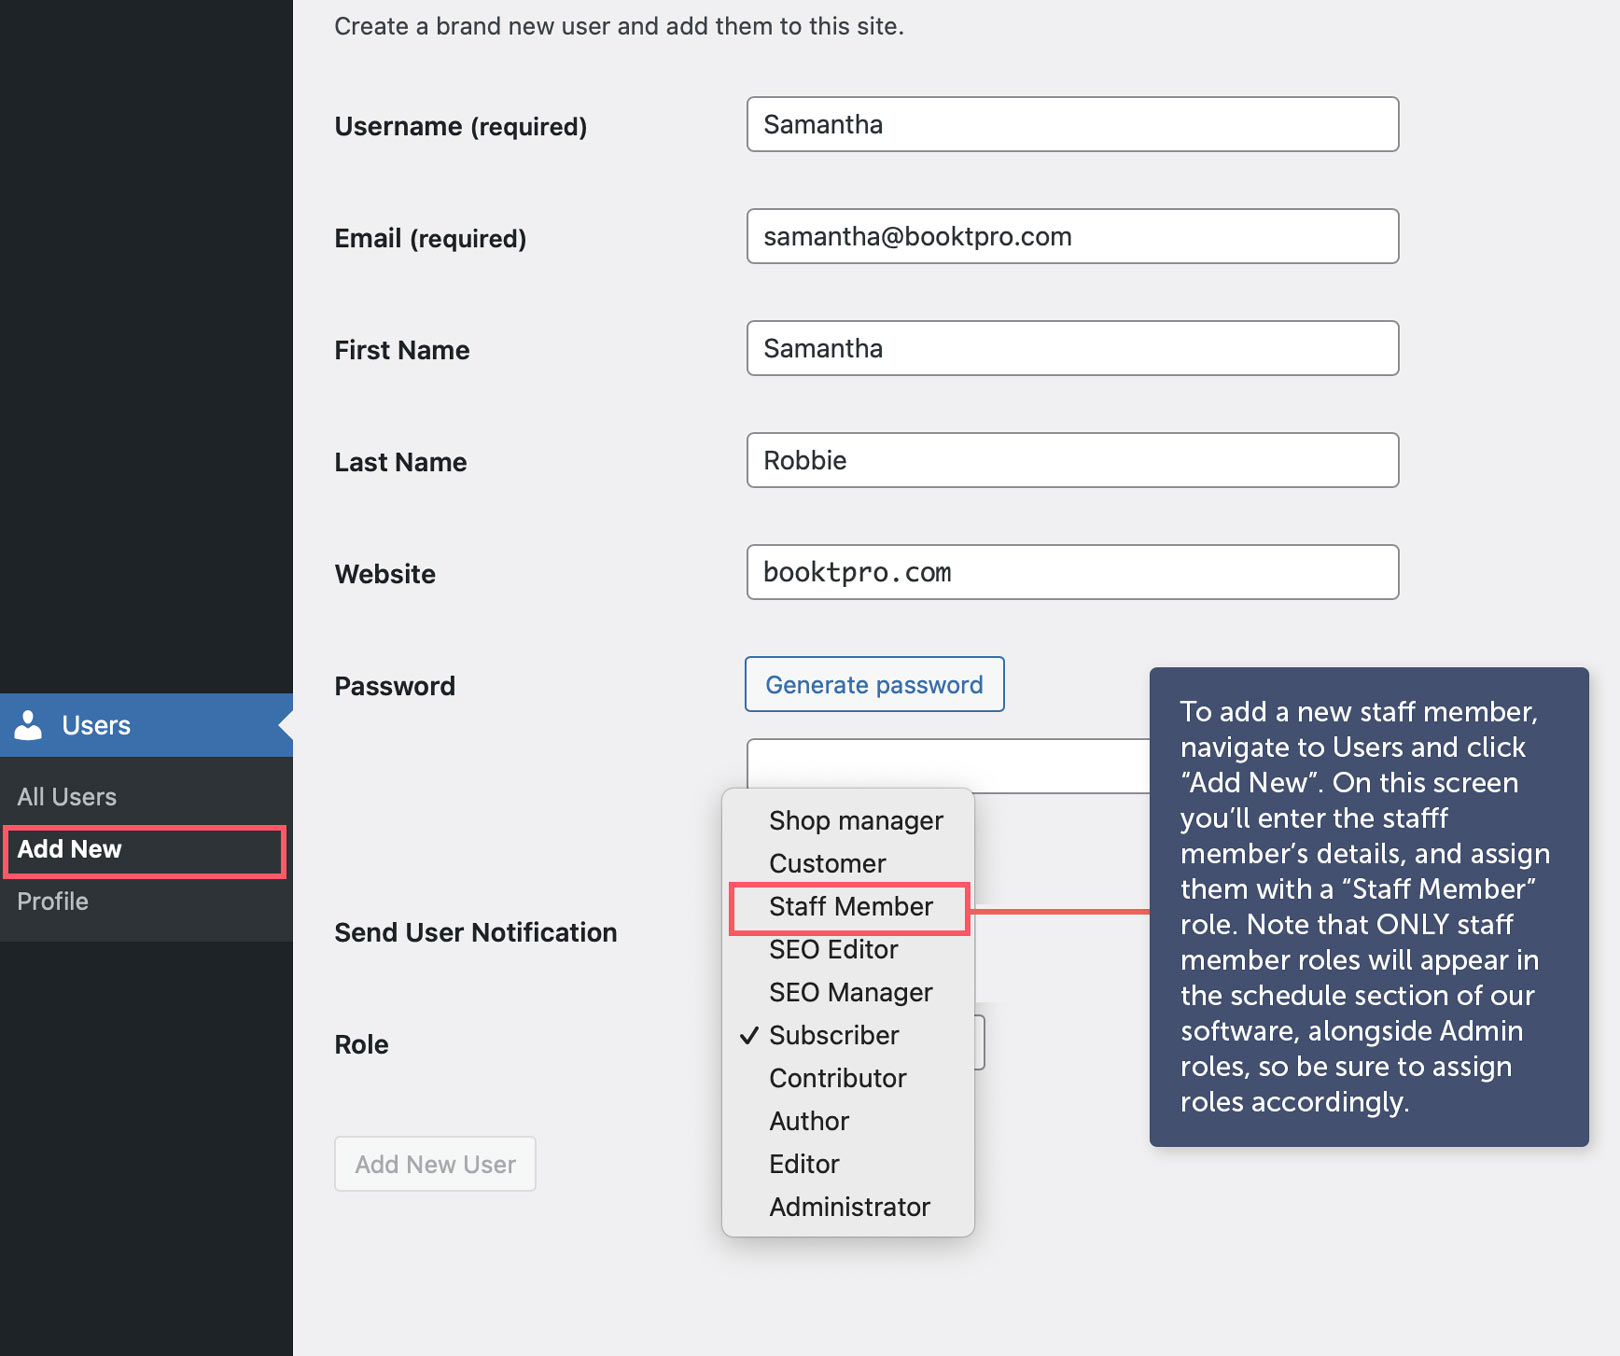
After you have assigned all details, click “Add New User” and the staff member has now been added to your site.
Note: The staff member will receive login details via the email you’ve set up here. They will also receive notifications of new appointments via this email, so be sure to confirm all info is correct before adding the user.
2. Add Staff Member to Schedule
Now that you’ve added the staff member, you will need to set up their schedule, in addition to including them on the front-end interface. To do so, navigate to BooktPRO (BooktPRO > BooktPRO Settings).
Once you’re in the BooktPRO Settings, navigate to the Schedule tab. By default, this will be set to display a “global schedule,” meaning it will have a single booking schedule and will ignore the Staff Members. To enable staff member support, be sure this box is deselected.
Also note that all staff members have been added to the dropdown seen on this page. You can select your staff members from this dropdown (after they have each been added as users) to add them to the booking interface, and edit their schedules. See below for full setup details:
You’ll need to be sure each staff member has been added to your schedule by ensuring each has the “Include this staff member on front-end” option selected, and that their schedule is properly set. After you’ve ensured this, click “Save” and the Staff Member will now be bookable!
What Staff Members see when logged in:
Note: Staff Members can now login to your site with their own login details, and will be limited to what they see. They will ONLY have access to their schedule, and appointments made specifically with them only. They cannot see your site settings, cannot change Bookt settings other than their own schedule, nor see other Staff Member appointments / schedules.
The admin(s) of the site will continue to see all settings however, in addition to being able to see all appointments made with any staff member.
Congrats, you’ve now added the Staff Member feature to your booking interface, and customers are free to book on your staff member’s unique schedule. To add more members, simply repeat the above steps for each staff member, though we recommend adding all staff members as users first, then setting their schedule per the above instructions. Enjoy, you team player you!
The "Help" Tab
Here is a detailed overview of the Help tab that provides details on how it all works, though the help tab itself of course contains everything you need to quickly deploy your booking functionality:
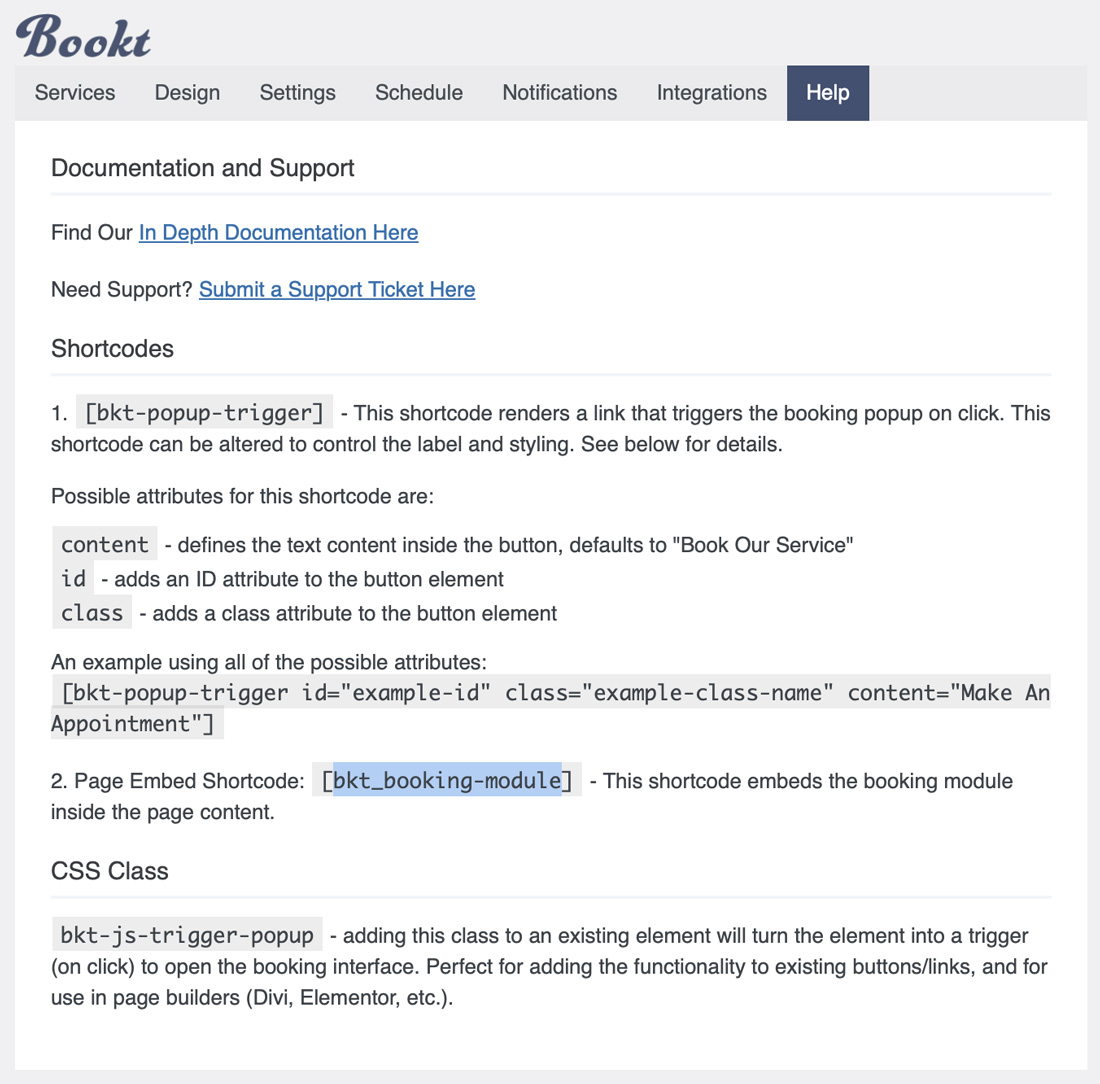
For quick reference, here is the same content found in the help tab, including the shortcode and CSS class needed to place your booking interface on your site:
Shortcodes
1. (bracket) bkt-js-trigger-popup (close bracket) – renders a button that triggers the booking popup on click.
Possible attributes for this shortcode are:
content – defines the text content inside the button, defaults to “Book Our Service”
id – adds an ID attribute to the button element
class – adds a class attribute to the button element
An example using all of the possible attributes:
(bracket) bkt-js-trigger-popup=”example-id” class=”example-class-name” content=”Make An Appointment” (close bracket)
2. Page Embed Shortcode: (open bracket) bkt_booking-module (close bracket) – This shortcode embeds the booking module inside the page content.
Classes
bkt-js-trigger-popup – adding this class to an existing element will turn the element into a trigger (on click) for the booking popup
For more details on adding core functionality to your site, please see the next two sections of this documentation.
Note that the class is what you’ll want to use if using a page builder like Divi when adding functionality to existing buttons, or buttons built with page builders.
Translation Support
Our software offers 100% translation support via .po file integration. This means third party plugins like WPML and Loco Translate are fully supported.
We highly recommend Loco Translate, a free plugin that we feel offers a much better, lighter experience than WPML. You can get Loco Translate Here.
We are adding .mo files on a regular basis, so there’s a good chance the translation to your language is already implemented. However, if you need to translate, you’ll find it to be a very simple, quick process. Due to each translation plugin handling things differently however, you’ll need to follow the guides specific to the service you’re using to translate our software.
How to Limit Preloaded Code (ie How to speed things up!)
This feature will let you limit preloaded code and will increase overall site speed.
To do so, navigate to the Settings tab in the main admin section. On that page, scroll to the bottom and you’ll find the section titled “Other Settings” which looks like this:
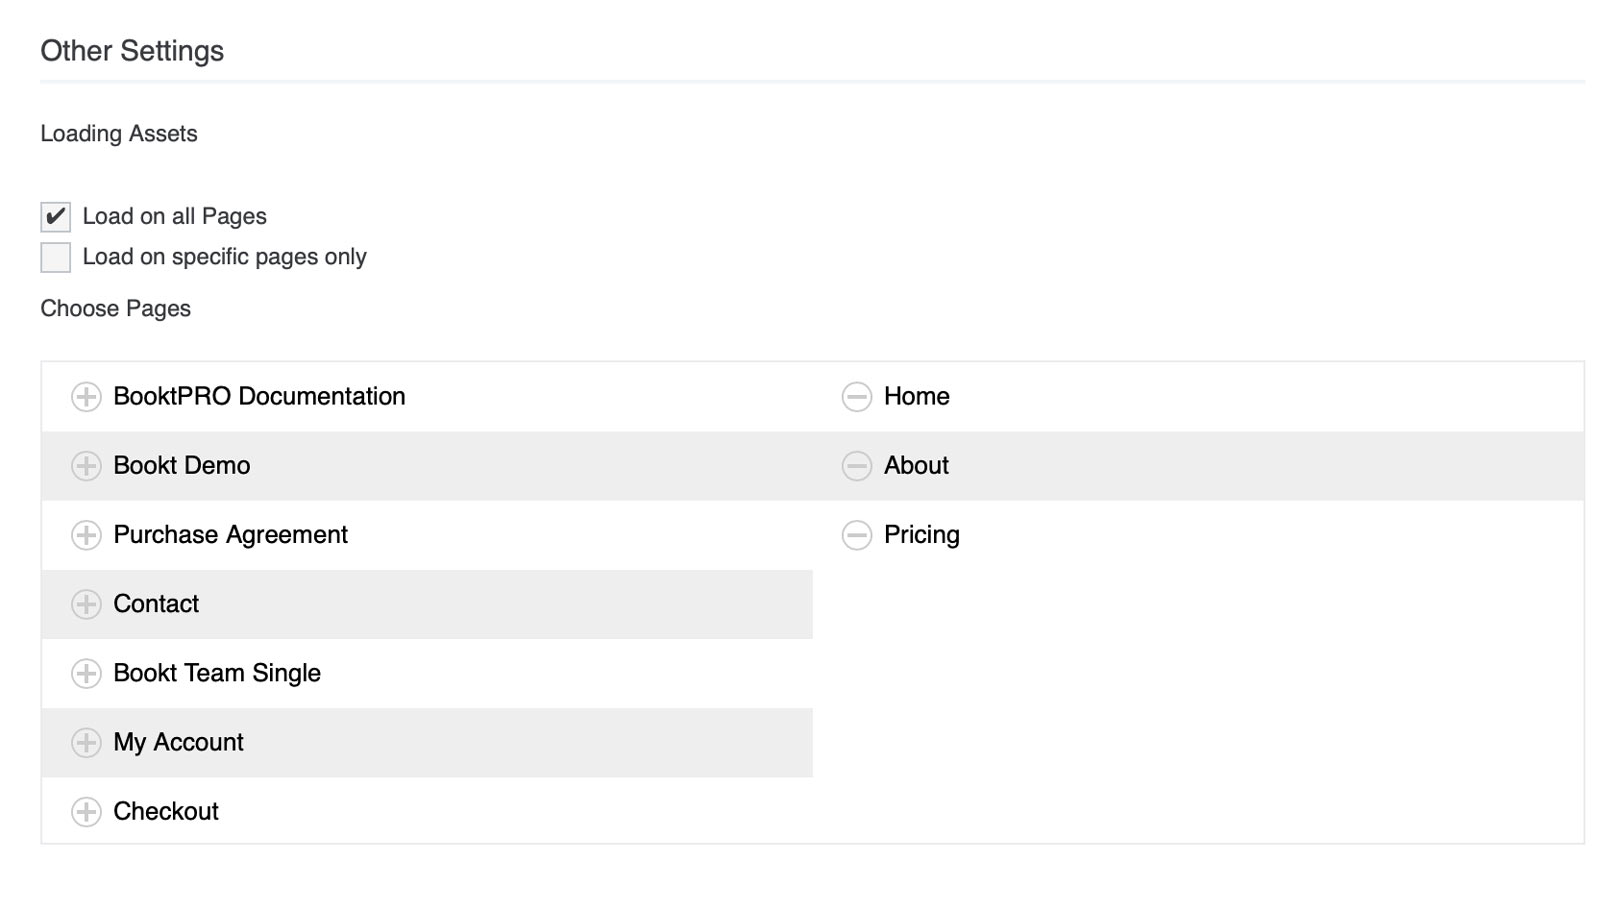
As you can see, you can choose to load the necessary code on all pages (required if you have the booking interface placed in a site-wide menu for example) or you can choose to add it ONLY to the page where you’ve implemented the booking interface.
To load on specific pages, select “Load on Specific Pages Only”, and choose the pages in the selector that appears beneath.
Adding Our Software to Your Site: New Button
One way you can add the booking interface to your site via a custom button, which is generate via a shortcode, or assign the booking functionality to a pre-existing button (such as those used in Divi Builder, or buttons you’ve already added to your site).
Add Via Popup (New Button)
To render a new button, simply enter the following shortcode on any page of your site:
(open bracket) bkt-popup-trigger (close bracket)
This will render a new button that, when clicked, will allow visitors to book appointments via BooktPro’s sleek front-end interface. Note you may also alter the button’s content by editing the shortcode, as described in the “Help” tab of the admin. We’ve included those details here for quick reference:
1. (open bracket) bkt-popup-trigger (close bracket) – renders a button that triggers the booking popup on click
Possible attributes for this shortcode are:
content– defines the text content inside the button, defaults to “Book Our Service”id– adds an ID attribute to the button elementclass– adds a class attribute to the button element
Adding Our Software to your site: Existing button (or on Divi)
Add a button, which is generate via a shortcode, or assign the booking functionality to a pre-existing button (such as those used in Divi Builder, or buttons you’ve already added to your site).
AddFunctionality to an Existing Button
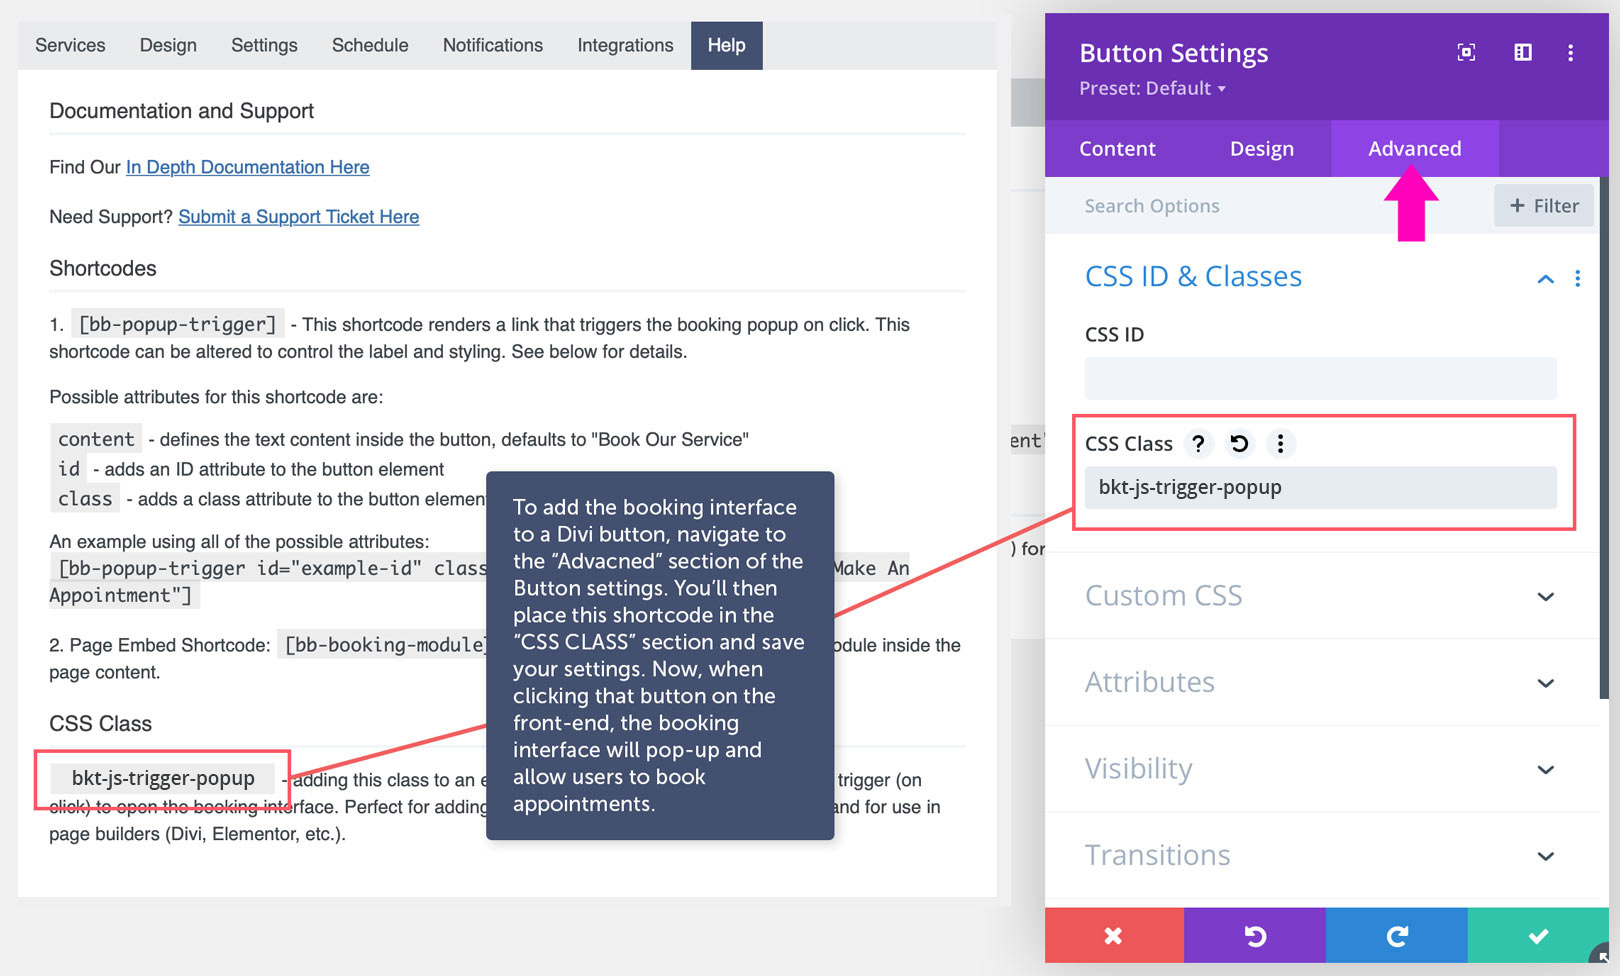
As described on the “Help” tab of the admin, you can add a CSS class to any button that already exists on your site. This allows you to add full functionality to any button without worrying about the buttons style and such. We’ve included the class here for quick reference:
bkt-js-trigger-popup – adding this class to an existing element will turn the element into a trigger ( on click ) for the booking popup
DIVI USERS: You can add the above class in the “Advanced” tab of any button, simply placing the shortcode in the “CSS Class” field. For other page builders, you will need to locate the eqivelant field.
How to Embed the Booking Interface Within a Page
You can embed the full booking interface directly within any page throughout your site
This is done by pasting the shortcode provided in the Help tab, or you can copy and paste it from here (note you’ll need to add brackets): bkt_booking-module
You’ll want to paste that code directly in the “Text” section of the page content (if on classic view) or use a “Shortcode” block in WordPress block builder. After you’ve published the page, the embedded version of BooktPto will appear, just as shown here.
Viewing Appointments
Now that booked appointments are rolling in, you’ll be able to review every detail in the “Appointments” tab of the main admin. In addition to an email notification, which are sent automatically each time a booking is submitted, each appointment will be collected in the “Appointments” section of the main sidebar in wp-admin. This link is found just under the “BooktPRO > BooktPRO Settings” tabs in the left sidebar. After clicking the Appointments link, you’ll see a familiar list of items, which are organized just like other WordPress posts and pages. These will be grouped in titles that include the name of the individual who booked the appointment, and time/date of the appointment. This allows a quick glance of upcoming appointments, but also includes the ability to search/filter appointments, and to create appointments manually.
For full details, you’ll want to click on an entry from the list. This detailed view will show every detail of the appointment via the “General” tab, which is covered in detail below:
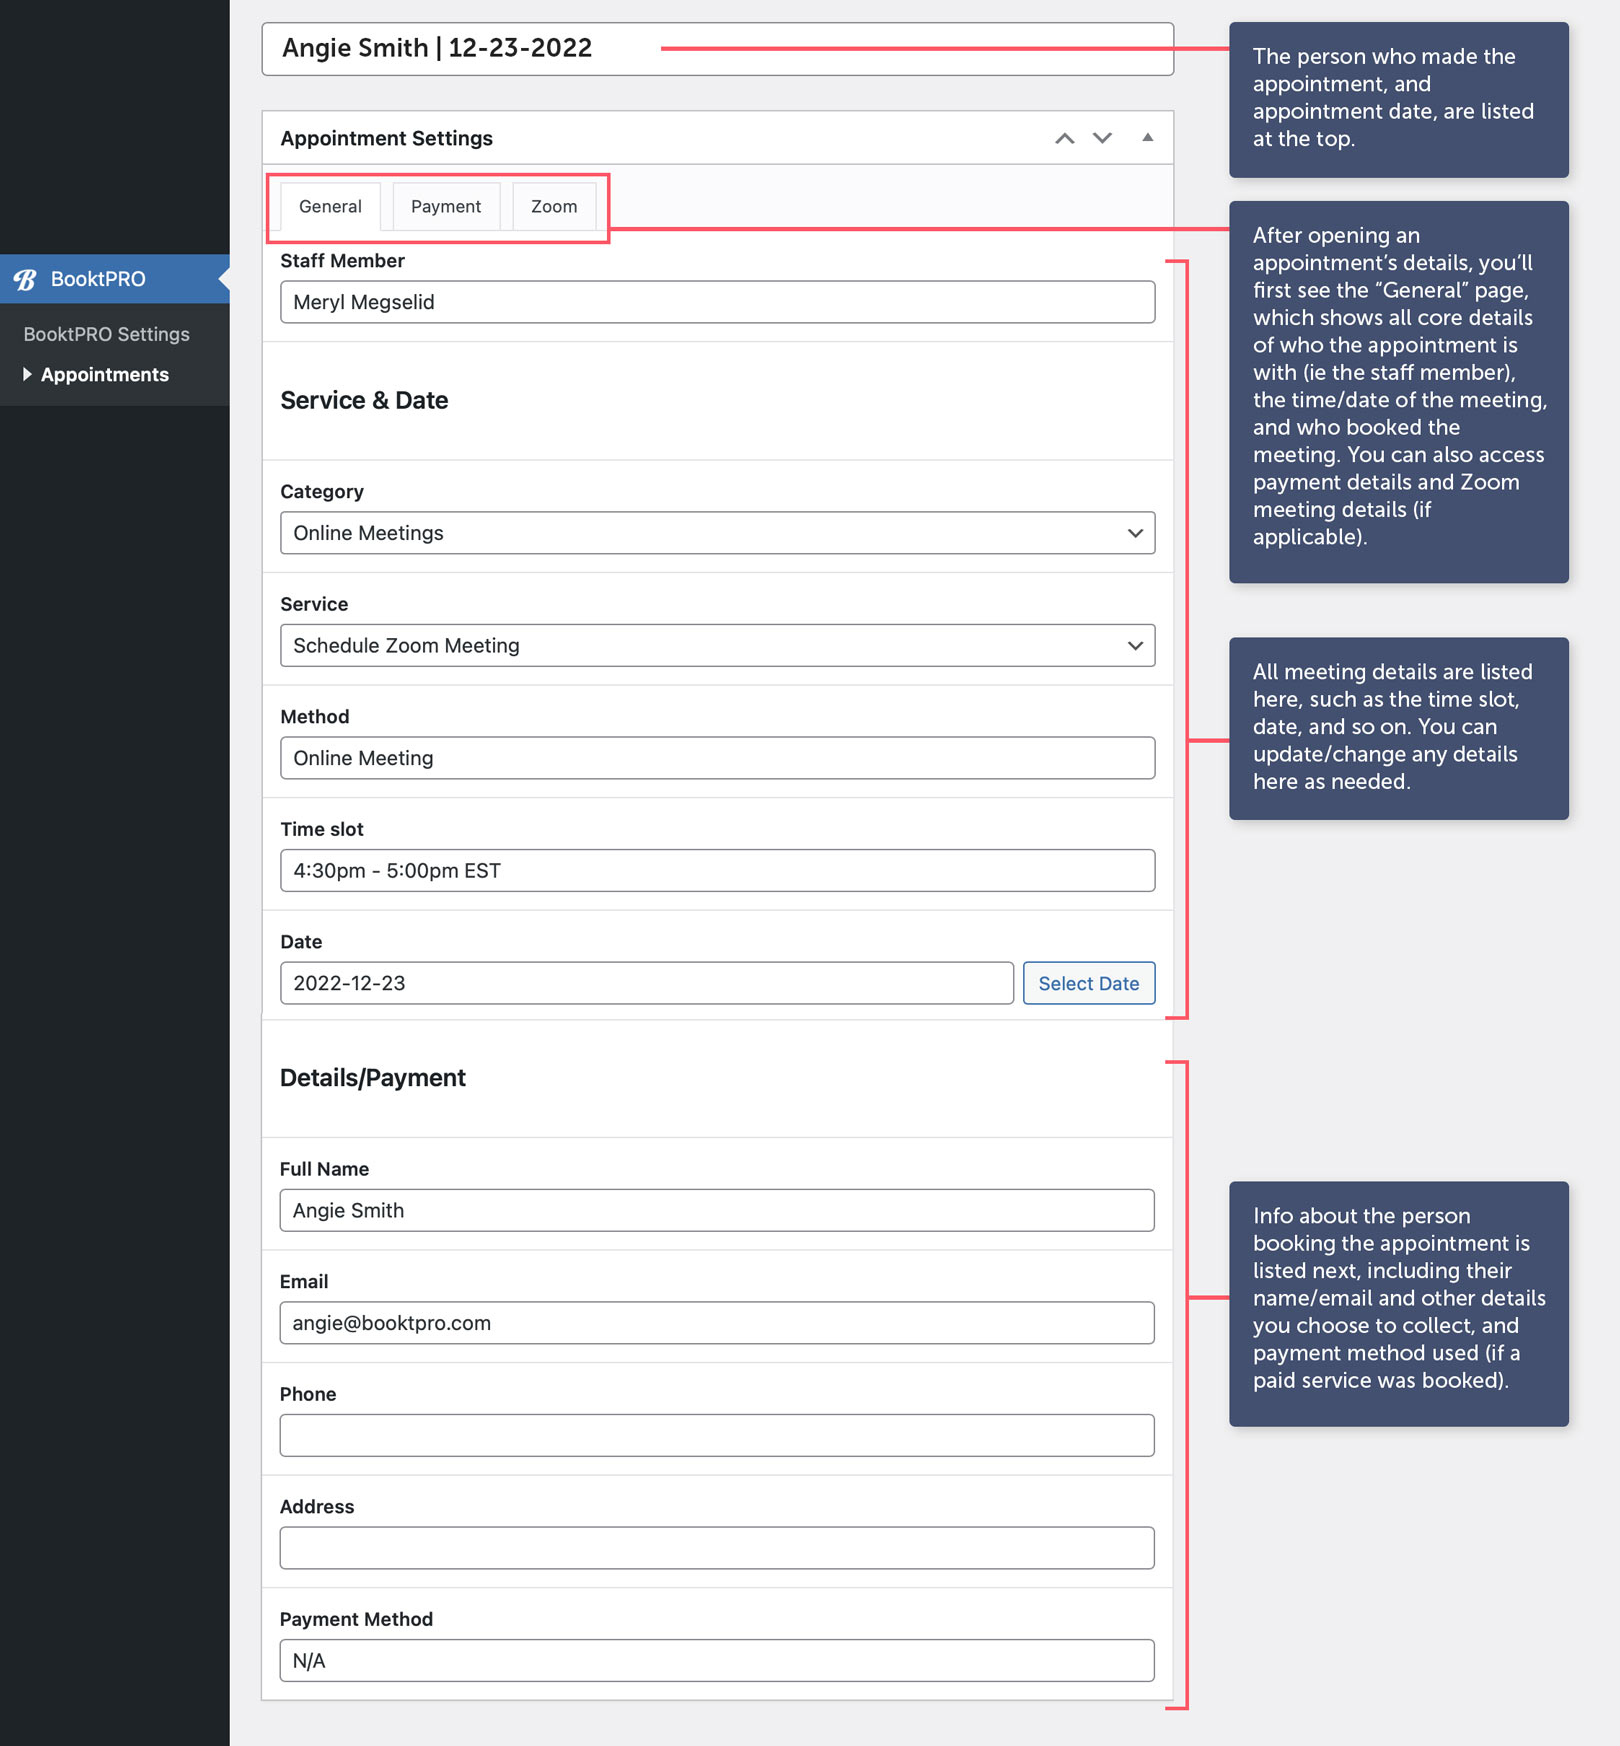
Note that you can change the time and date of each appointment as needed on this page, along with all other details pertaining to the appointment itself. If you have collected payment for any specific service, you’ll also be able to see these details in the “Payments” tab, which we cover in the next section.
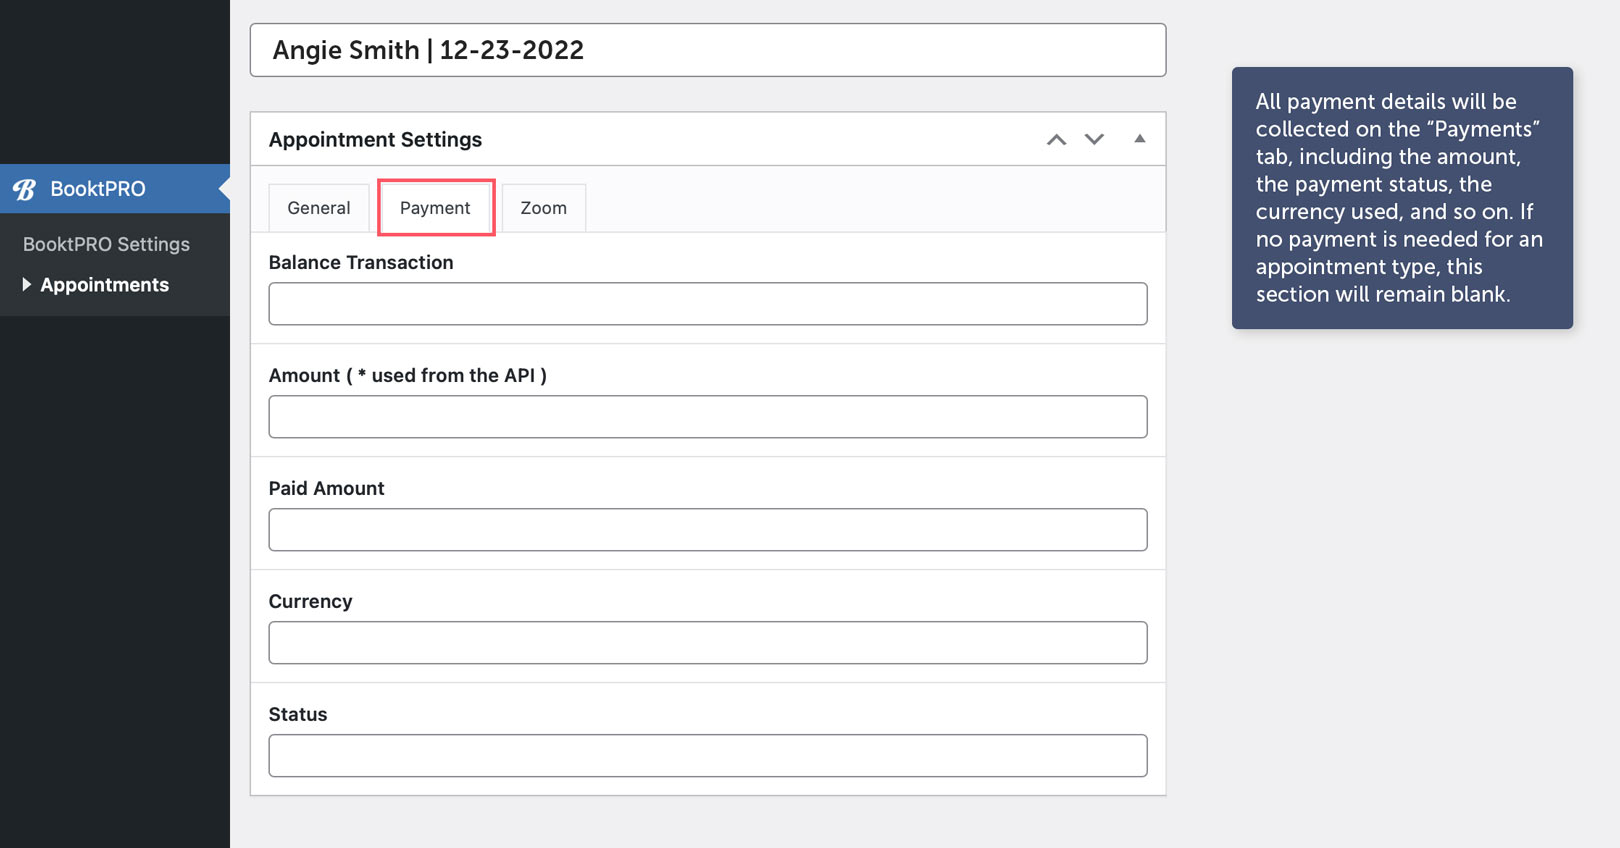
Appointments > Payment Details
If the service you selected has a payment attached to it, and if customers paid for the service during the booking process, you can see details on the payment by clicking the “Payments” tab, which is found in each detailed view of an appointment under the “Appointments” section of the plugin. Note that our software does not collect any sensitive payment details from customers, and this info is simply aggregated from your Stripe account. To refund customers for any reason, you will need to do so via your Stripe account as well. Check out the image below for a detailed overview of payment details:
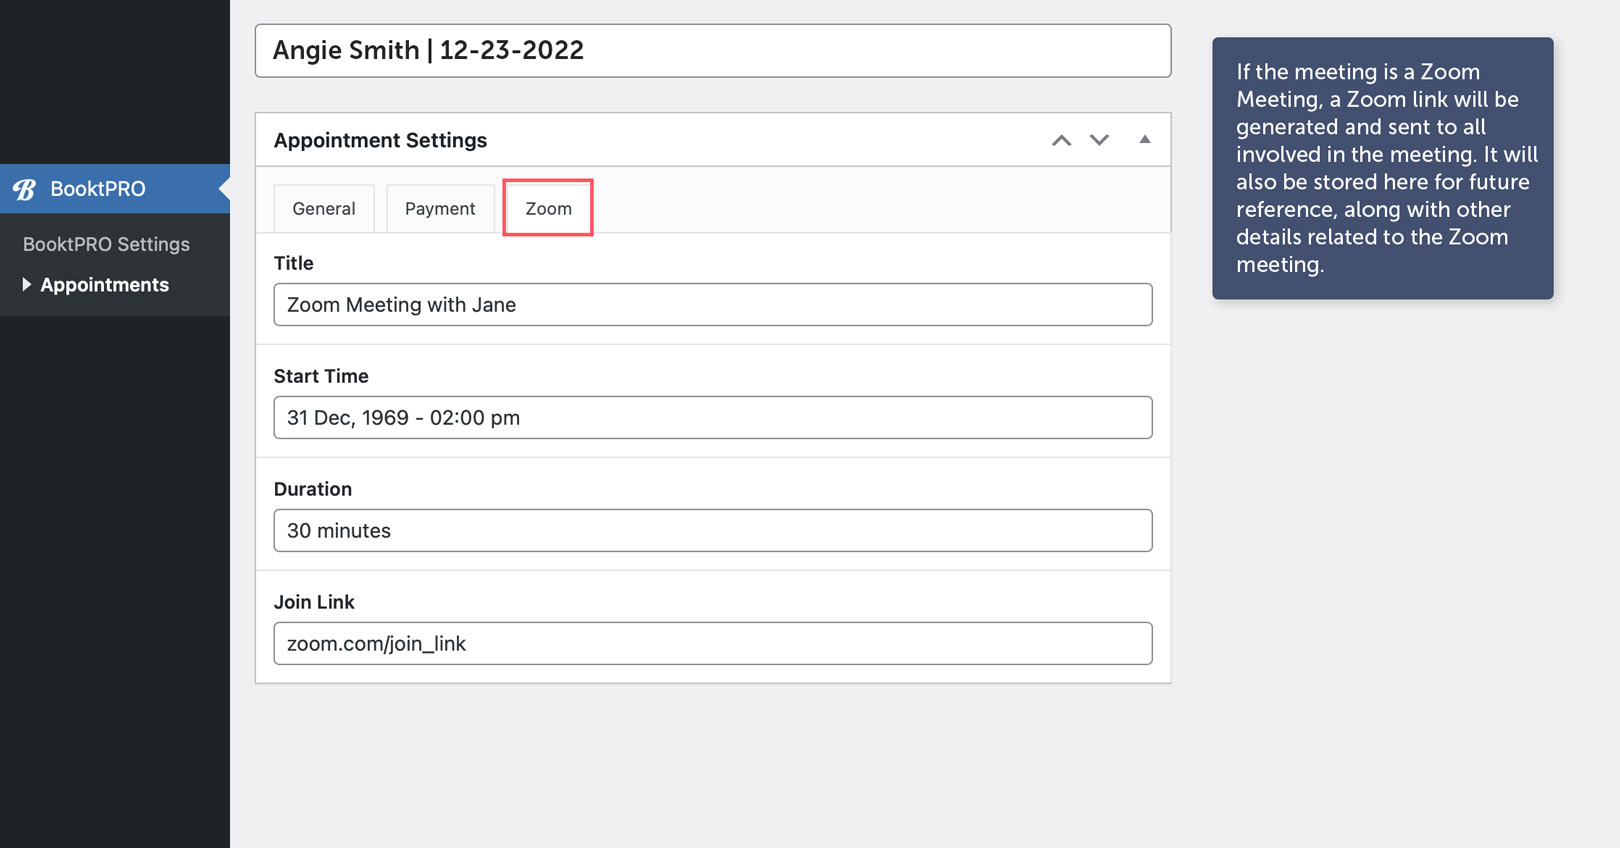
Zoom Details
If Zoom Meetings are enabled on this specific meeting, all Zoom details will be collected in the “Zoom” tab for future reference, as described here:
Appointment Email Notifications
In addition to collecting all appointment details in the Appointments section of admin, the site admin, staff member, and the visitor who booked the appointment will also receive an email notification each time an appointment has been booked. Please see the “Notifications” section of this documentation for full details.
You can also allow the ability for customers to sync with Google Calendar, allowing you both to share notifications of upcoming appointments. These elements ensure that you’ll never have a scheduling conflict again, and lets your site do the work for you instead of worrying about incoming meetings.
The Front-End Interface
After you’ve setup your services, and included everything you need when setting up the plugin in admin, your booking interface is ready to launch! The booking process was designed in a similar manner to a store checkout process, and consists of 3 main steps, followed by a confirmation. This streamlined process is designed to boost customer/client bookings due not only to its quick and easy process, but also its sleek and professional design. Below is a detailed overview of each step of the front end customer experience. For each step, you can easily see how each element you’ve setup in admin has carried over to the front end, but when in doubt feel free to refer to earlier sections of this documentation.
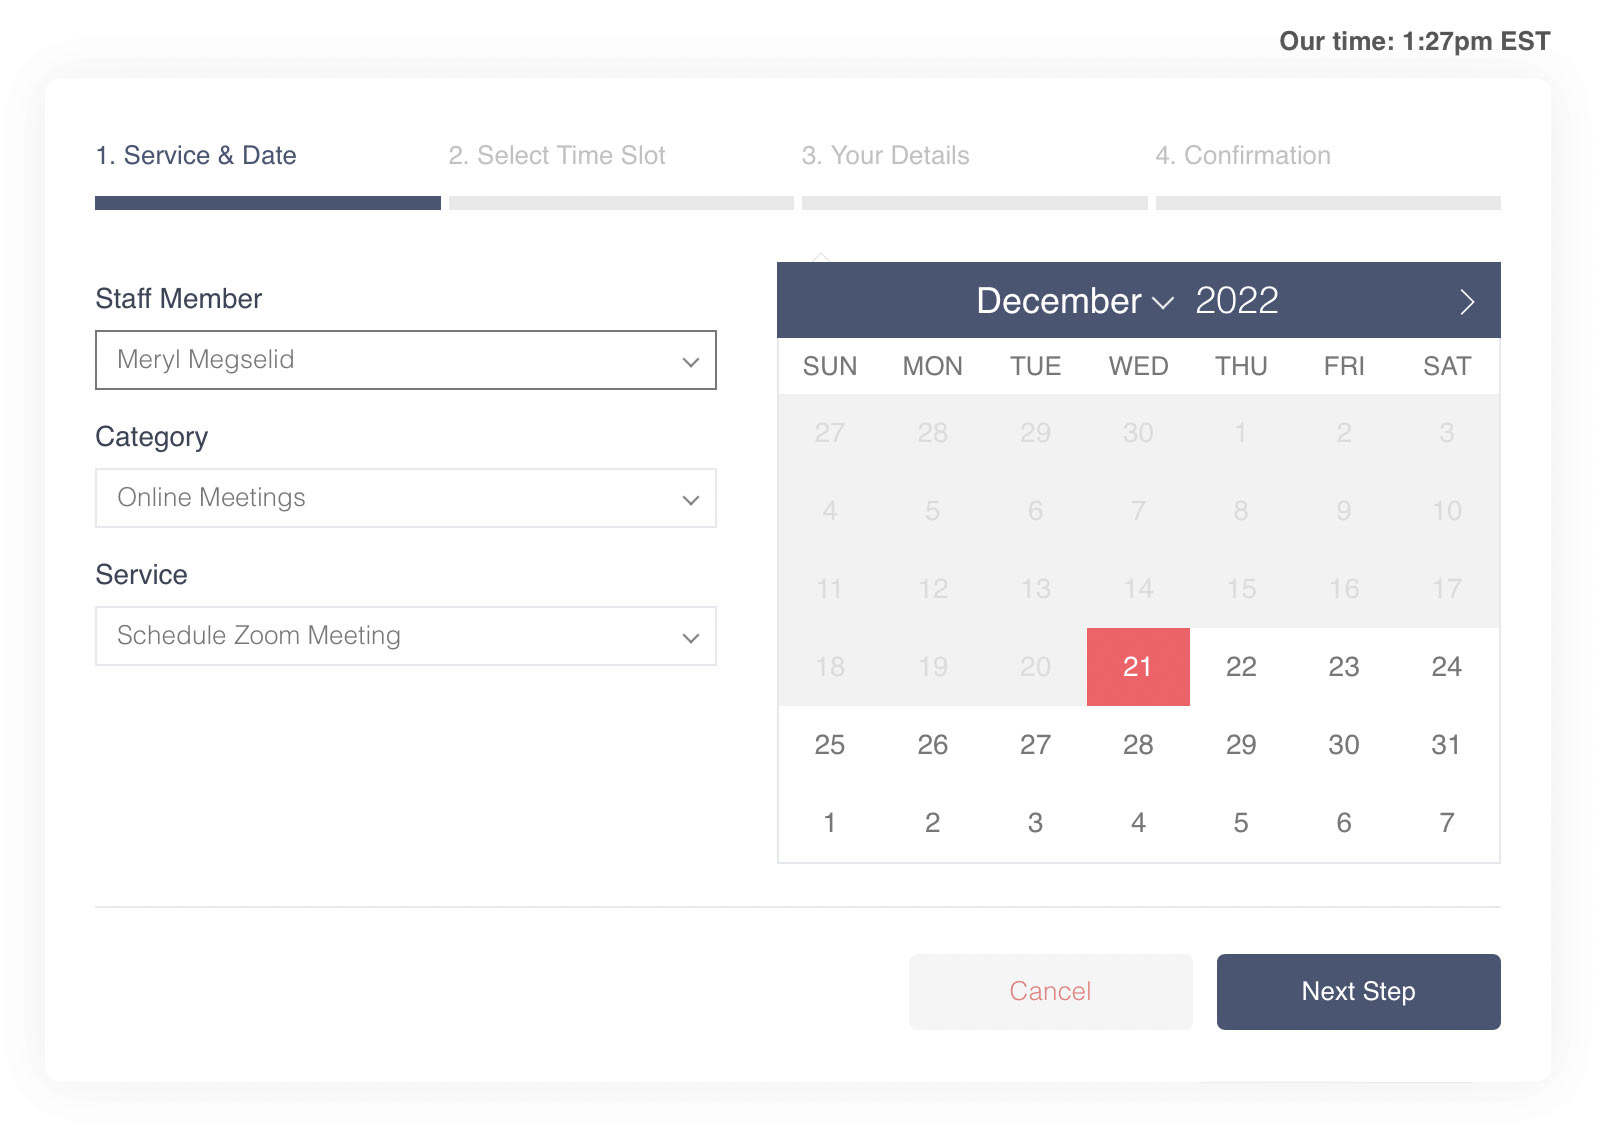
In the first step (shown above), users can select the staff member they’d like to book with, the meeting category, the meeting type (such as a Zoom meeting or phone call), and the date they’d like to make the appointment.
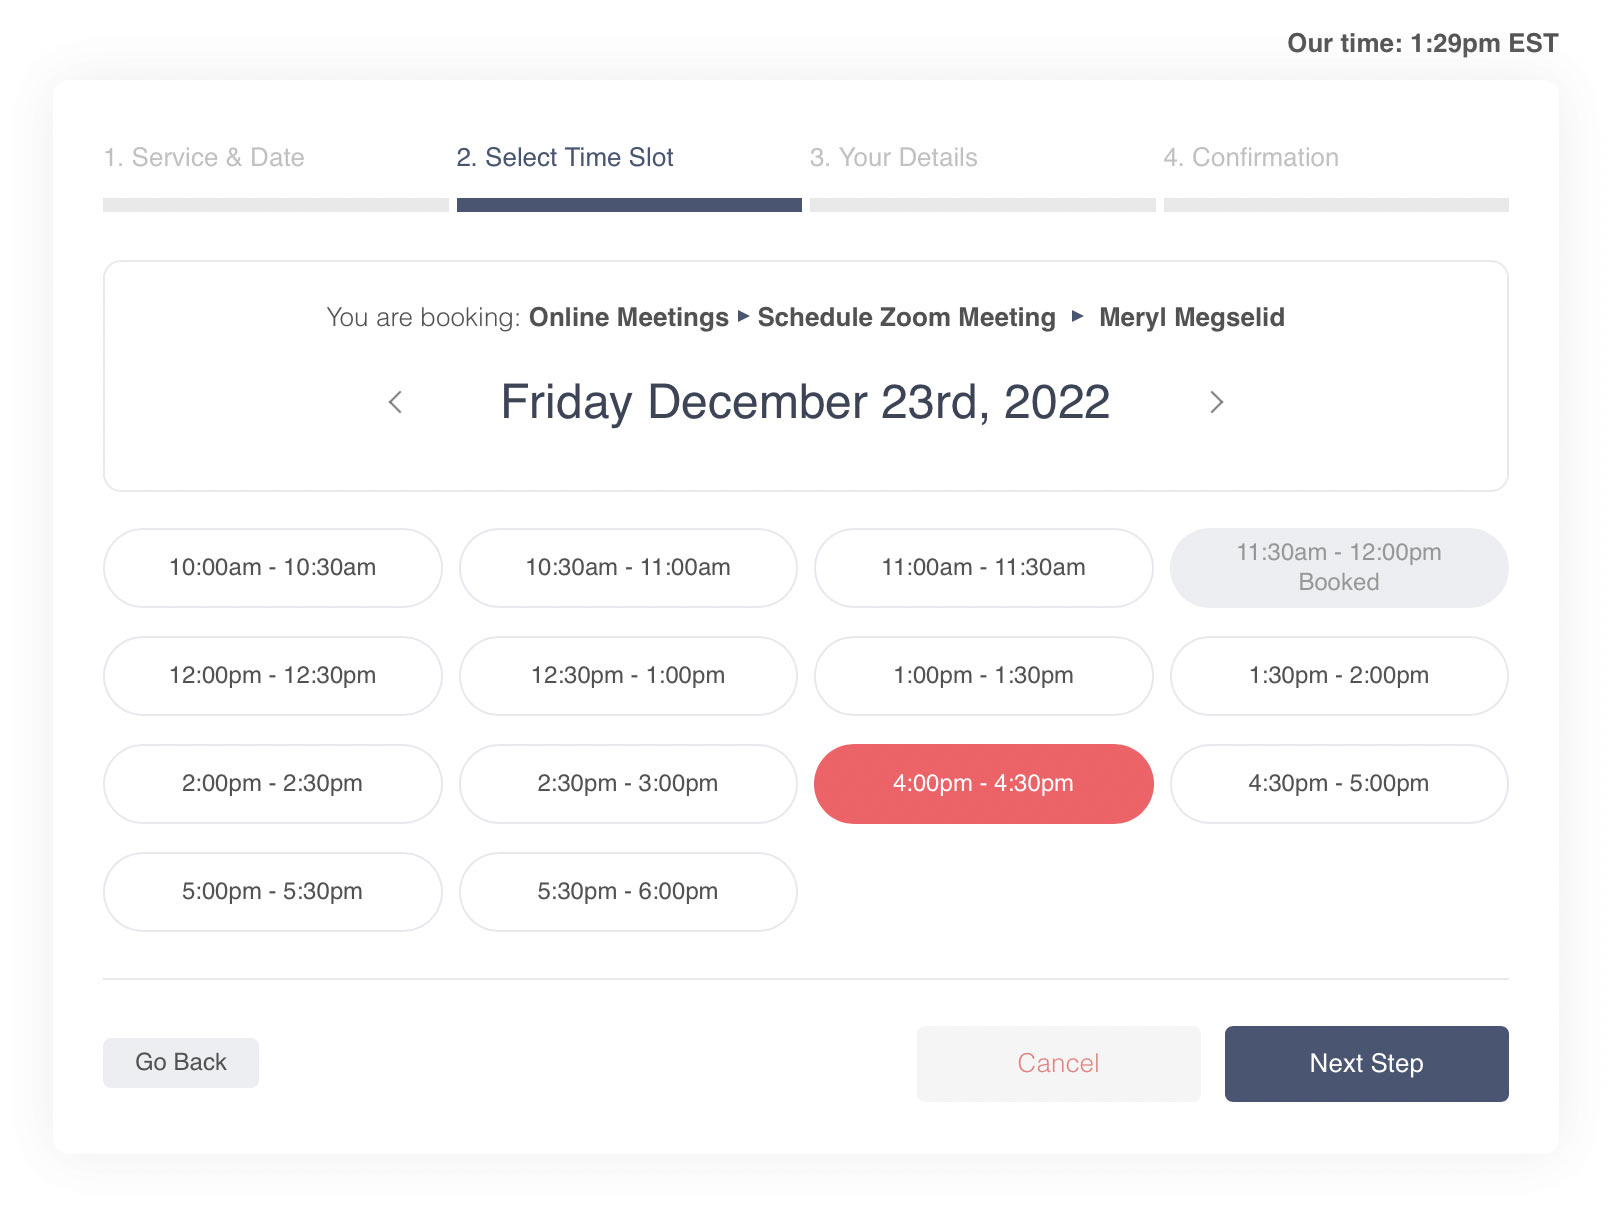
On step 2 (shown above), users will select their time slot on the specific day they selected form step one. They can choose to change the day in the slider portion showing the date, and will also see if slots have been previously booked by others.
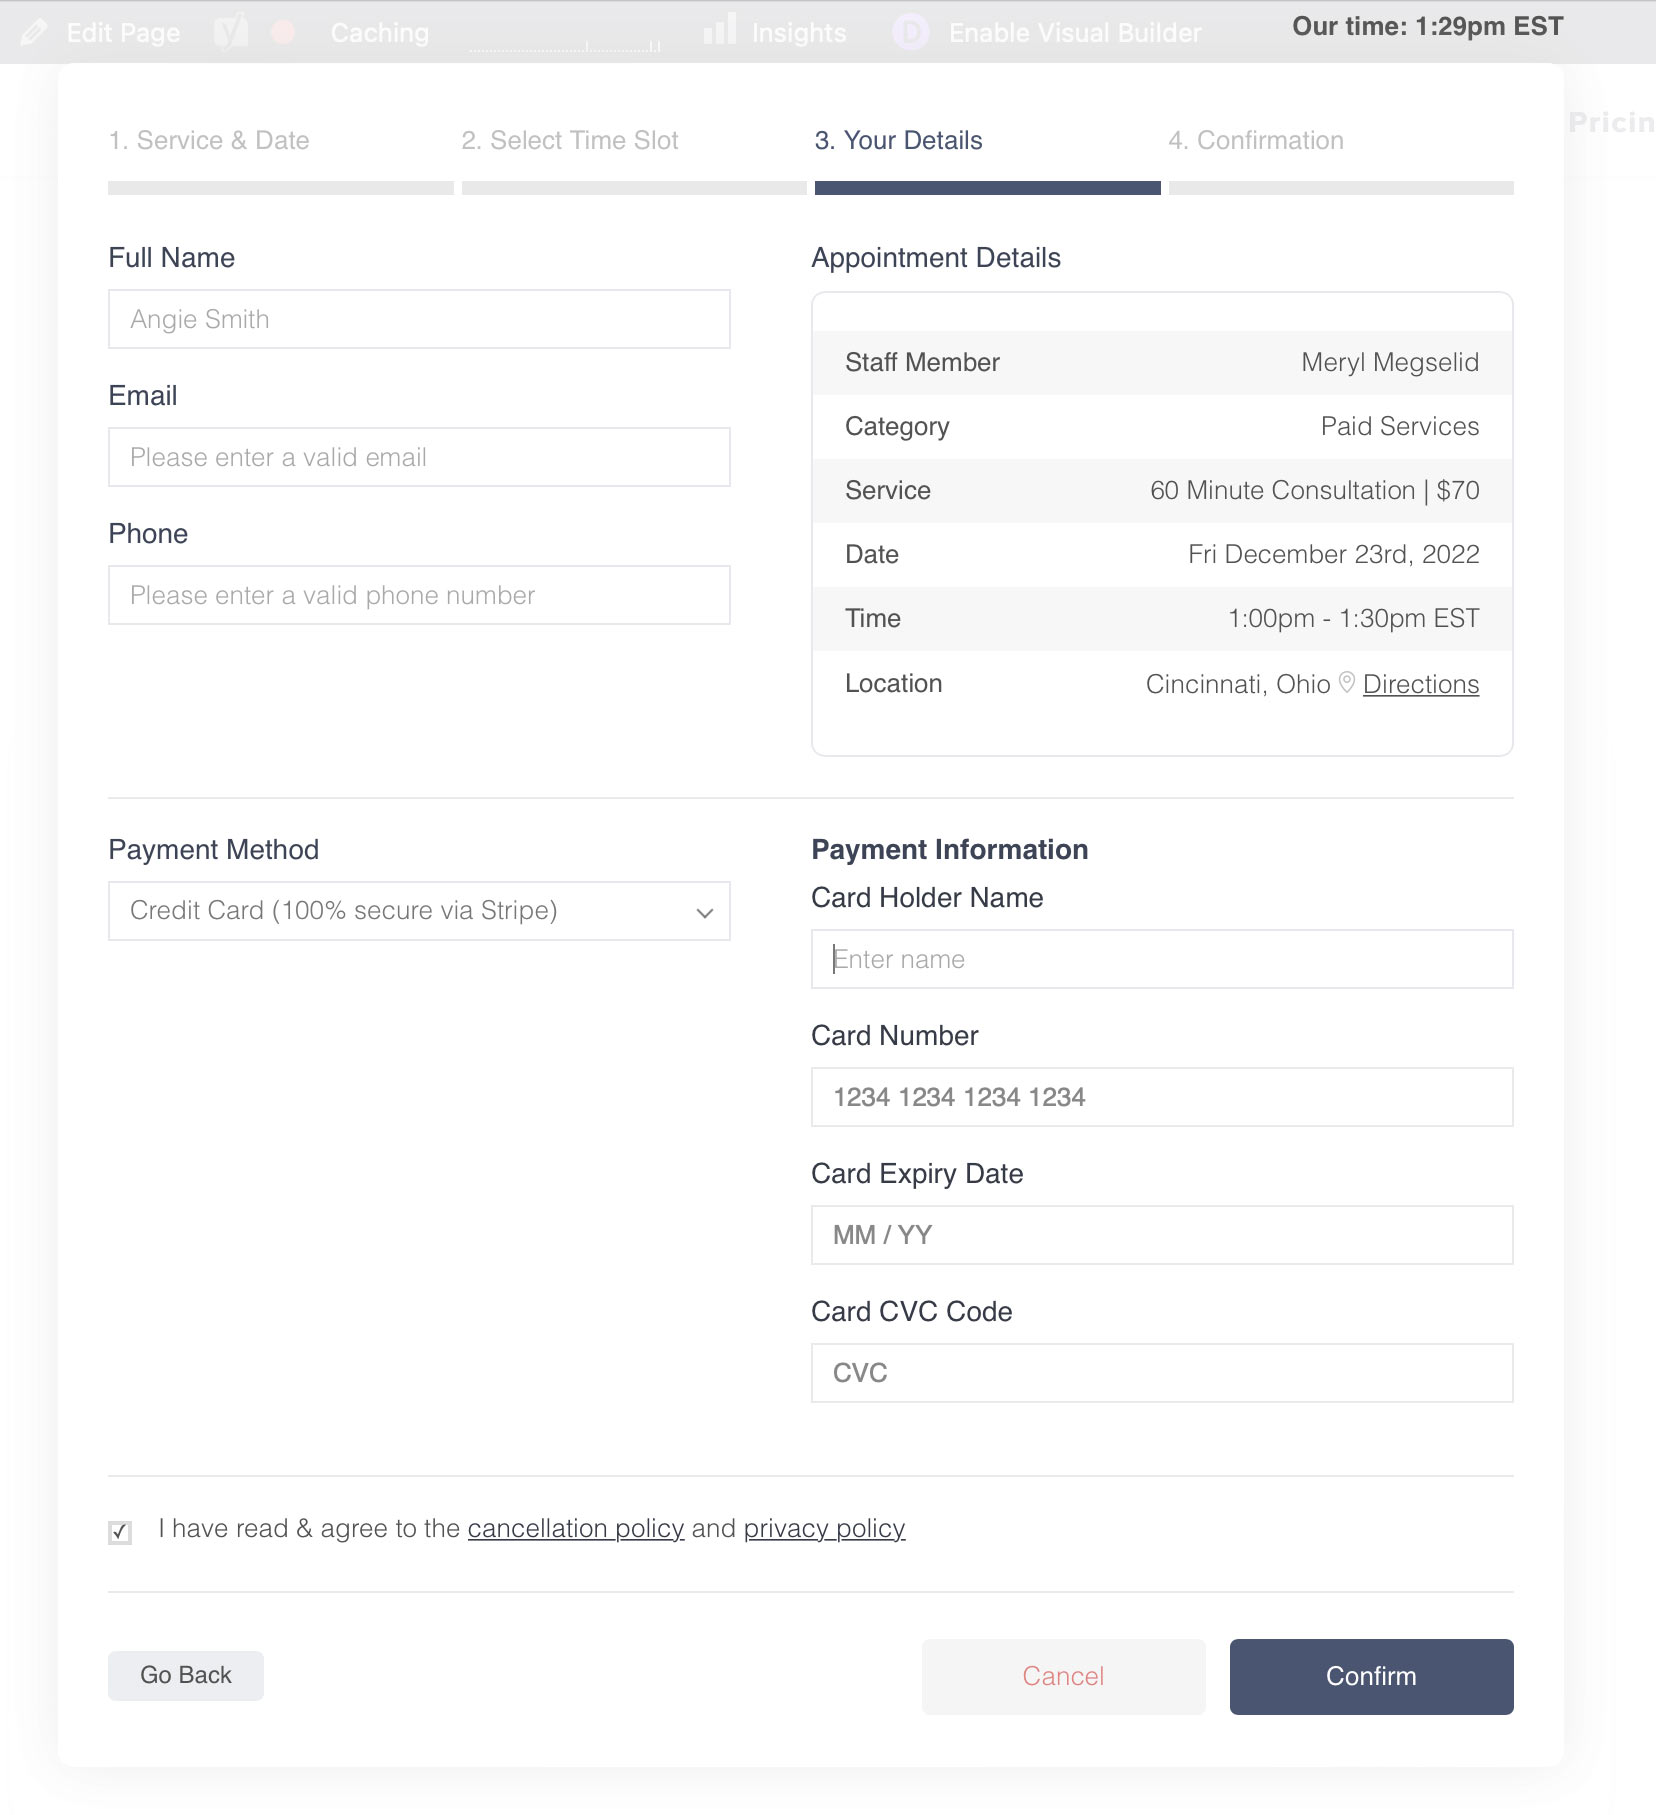
On step 3 (shown above), users will enter all of the requested details while also seeing an overview of the meeting. Additionally, they can choose to pay for the meeting if it is a paid service via our secure online payment system. You can choose to let them get directions for on-location meetings, and agreeing to a terms of use before committing to the appointment. Note that all of these elements are optional, and modular in nature based on how you choose to setup your booking needs.
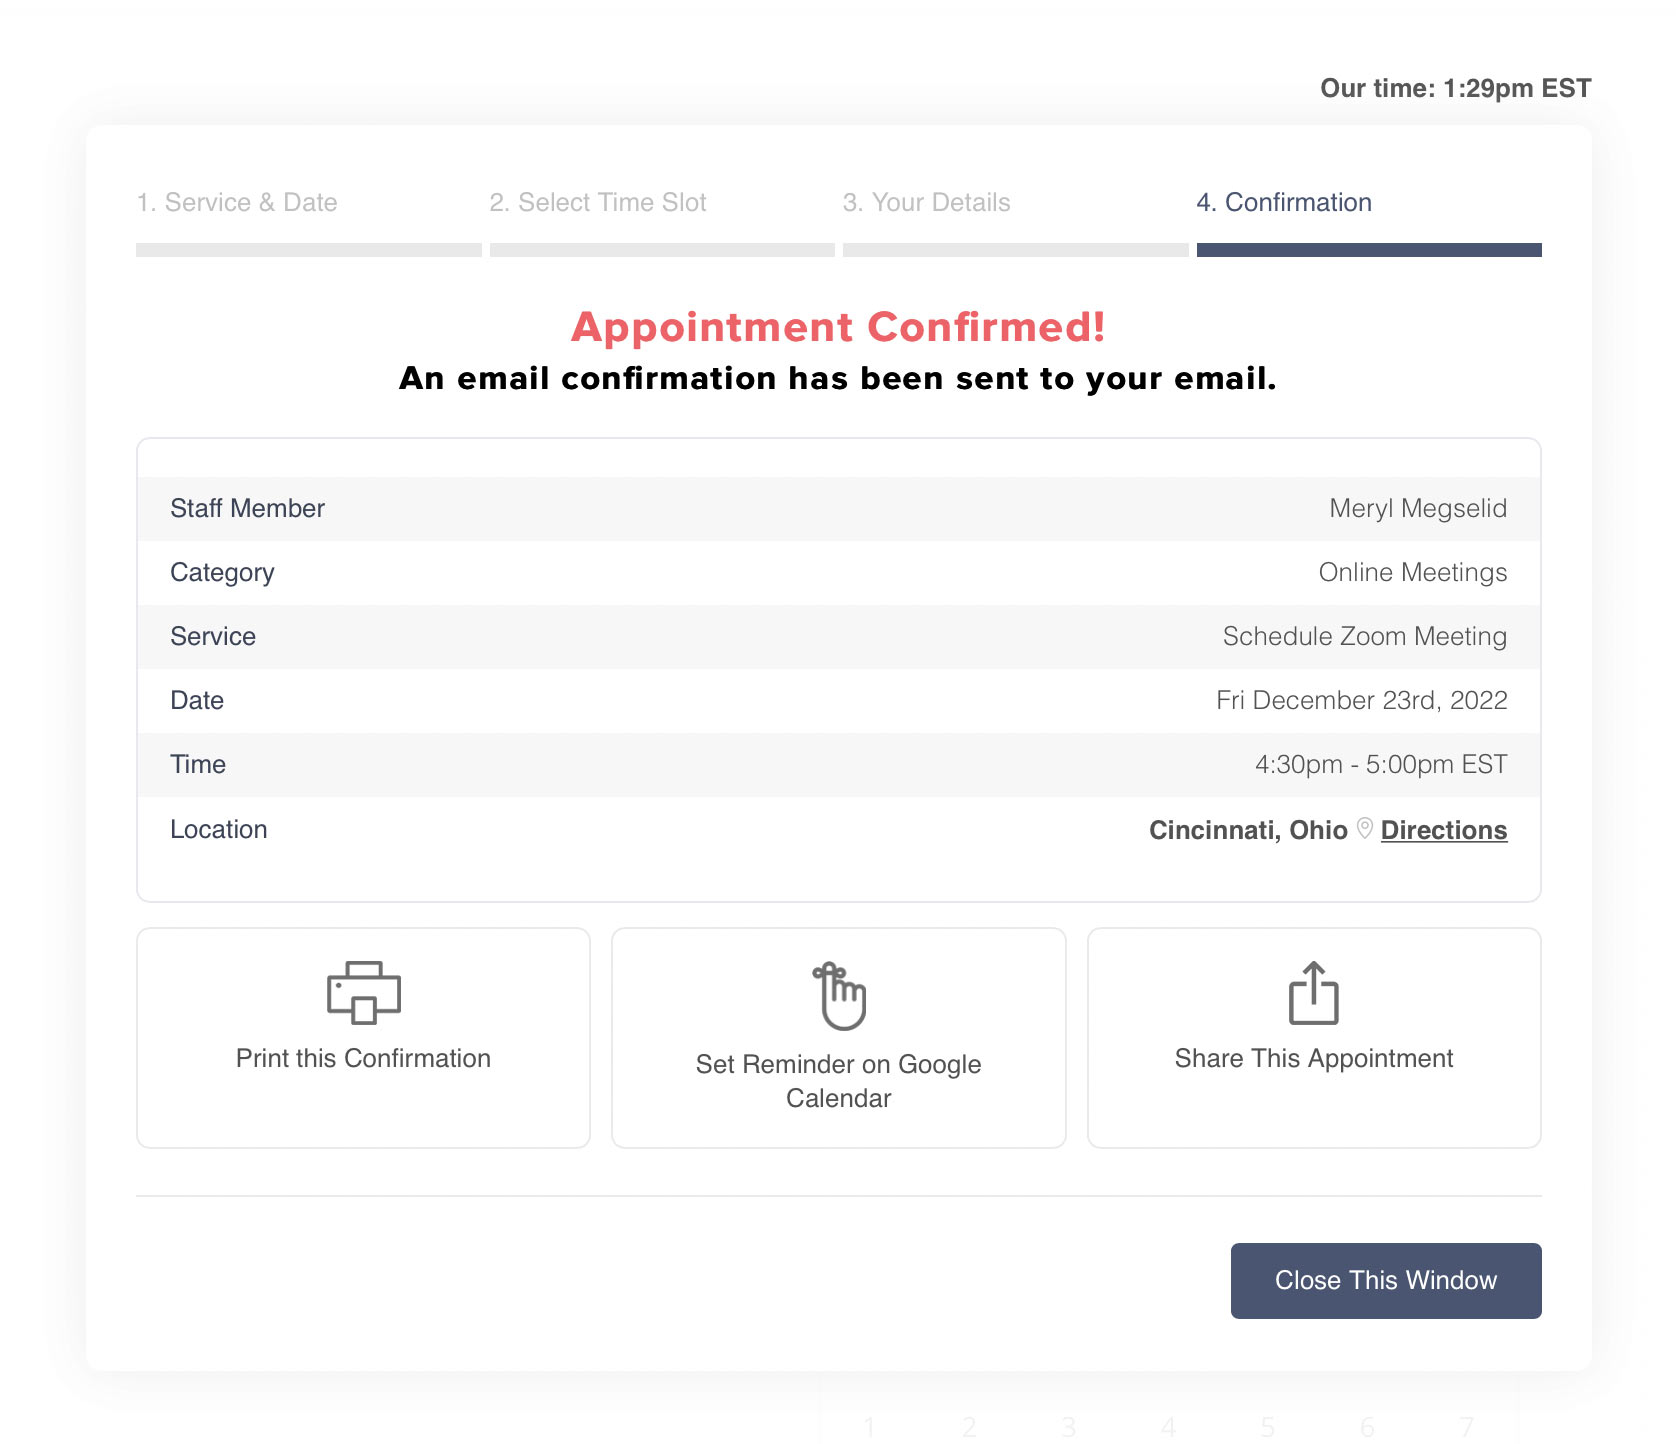
The final step (shown above) serves as a confirmation for the meeting, and lists all details alongside some options for the user to print the meeting details, share on social media, set a reminder on their own Google Calendar, and so on. On closing the interface, they can also be redirected to any page you like. Again, these settings all depend on how you’ve customized your booking service in the Admin’s Settings tab.
Don’t Forget: Our software is 100% Responsive! In other words, it will display perfectly from any device, allowing your visitors to book from there desktop PC, or on the go via any mobile phone or tablet device.
That covers it! If you need further assistance, please see the next section.
Additional Resources
Still need help? Feel free to submit a ticket here to our 24/7 support system.